How To Add Footnotes In Google Docs

Table of Contents
Google Docs is a free word processor that allows you to create documents and share them with other people. It has a simple interface that makes creating and editing documents quick and easy.
Footnotes are notes or comments added at the bottom of a document. They provide additional information and context to the reader. You can open a dialog box where you can select from various options such as adding a footnote number, date, etc.
Prime Day is finally here! Find all the biggest tech and PC deals below.
- Sapphire 11348-03-20G Pulse AMD Radeon™ RX 9070 XT Was $779 Now $739
- AMD Ryzen 7 7800X3D 8-Core, 16-Thread Desktop Processor Was $449 Now $341
- ASUS RTX™ 5060 OC Edition Graphics Card Was $379 Now $339
- LG 77-Inch Class OLED evo AI 4K C5 Series Smart TV Was $3,696 Now $2,796
- Intel® Core™ i7-14700K New Gaming Desktop Was $320.99 Now $274
- Lexar 2TB NM1090 w/HeatSink SSD PCIe Gen5x4 NVMe M.2 Was $281.97 Now $214.98
- Apple Watch Series 10 GPS + Cellular 42mm case Smartwatch Was $499.99 Now $379.99
- ASUS ROG Strix G16 (2025) 16" FHD, RTX 5060 gaming laptop Was $1,499.99 Now $1,274.99
- Apple iPad mini (A17 Pro): Apple Intelligence Was $499.99 Now $379.99
*Prices and savings subject to change. Click through to get the current prices.
In this article, we look at footnotes in closer detail and go through how you would add footnotes to your Google Docs in a step-by-step guide with screenshots attached. Let’s jump in.
Adding Footnotes to a Google Doc
You can add footnotes and any other citation using built-in features, add-ons, and plenty of other tools. It’s simple to do, and you can do it either on the web or in the app.
Footnotes are usually used for long quotes, references, or citations. For example, if you want to cite an entire book chapter, you could use footnotes. But there are many other uses too.
If you have a quote, you can add a footnote to the quote so that readers know who said what and you can avoid plagiarism. If you’re writing a paper, you might use footnotes to explain certain terms, definitions, or concepts too.
Footnotes are required in most academic papers and offer a way to simply cite sources and provide additional details on the source. So how do you do it?
Manually Add A Footnote
You can do this on the web or in the mobile app for Google Docs.
Step
Add Footnote
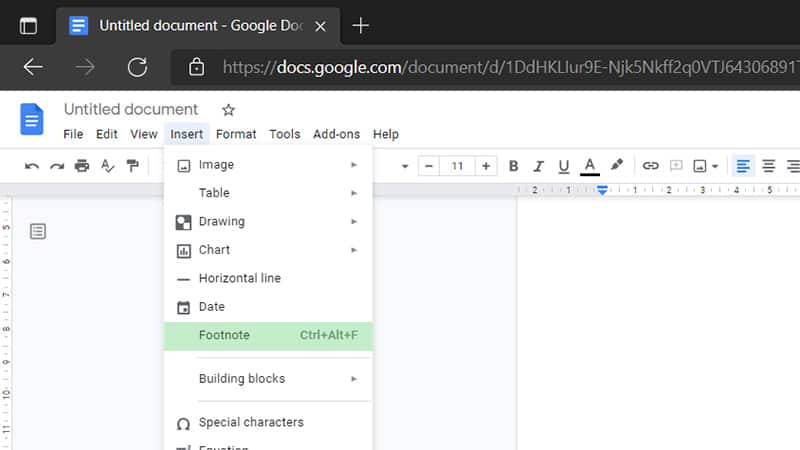
When you are using a browser, you are going to need to first place your cursor wherever you want to add a footnote, such as the end of a sentence, before finding the ‘insert’ tab and clicking ‘footnote’.
Then you can simply type and add in your footnote text.
If you are using the mobile app, again, move your cursor where you need to add your footnote and tap the + at the top of the screen to find the “insert” tab. Then simply scroll through until you find the “footnote” option. Click on this and type your footnote text.
Adding A Formatted Footnote Using The Explore Feature
The Explore feature on Google Docs allows you to add a formatted citation footnote in your document on a web browser. Below we guide you through the process.
Step
Explore
Click the Explore icon. You should find this in the lower right section of the screen when you have the document open.
Step
Cite A Source
To cite a source, enter the keywords and press Enter. This should then do the research for you. However, if you already know the website you need to cite, paste the link directly in the search bar.
Step
Search Web
Select Web within the Explore tab to see all of the search results from the internet as opposed to Google Drive.
Step
MLA Style
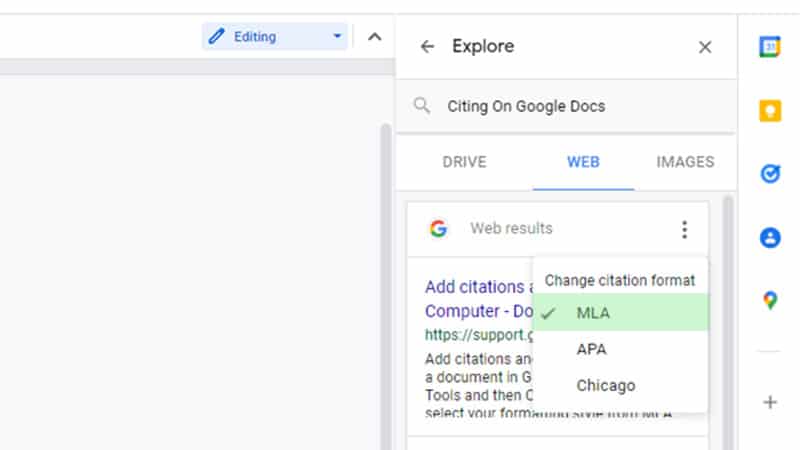
The system will automatically create footnotes in Modern Language Association, otherwise known as MLA style. To change this, all you need to do is select the three dots in the menu in the panel, then choose which format you want the citation to be in.
Step
Position Cursor
Place the cursor where you would like to have a footnote in your document such as at the end of a particular sentence.
Step
Insert Footnote
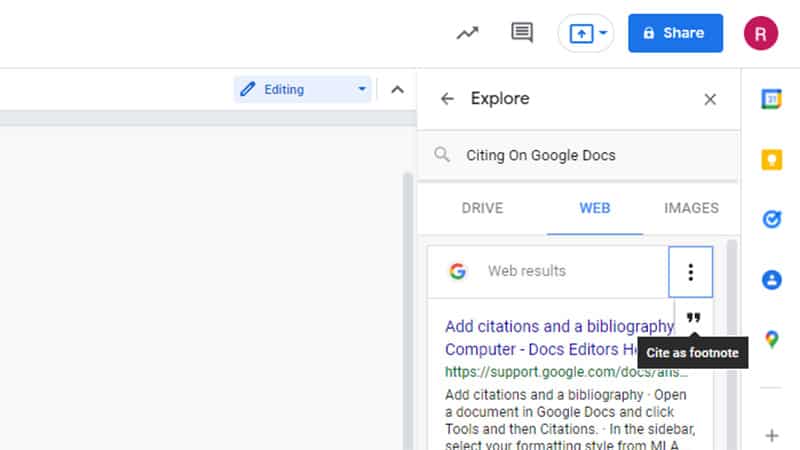
Move the cursor to the search result you want to be cited and click the quote icon, which is displayed on the right.
The system will insert a footnote number where your cursor was at the end of your sentence in your document, and pop the footnote at the bottom of the page.
Final Thoughts
We hope you have enjoyed this article and learned everything you need to know about footnotes, including how to manually insert them in your document, as well as use the Explore panel to do it for you.
The Explore panel is such a simple and useful tool, which can make citations that little bit easier when you have a big academic assignment to worry about! So why not make use of it and take a little stress away!


