How To Create Drop Down List In Google Sheets

Table of Contents
When you create a drop-down list in Google Sheets, you can ensure that users are only allowed to select from a list of already defined options. This can be essential for creating consistent data that is easy to use. Instead of allowing them to type a variation of an answer, only the options you decide on should be chosen.
Let's take a look at how you can do this today!
Prime Day is finally here! Find all the biggest tech and PC deals below.
- Sapphire 11348-03-20G Pulse AMD Radeon™ RX 9070 XT Was $779 Now $739
- AMD Ryzen 7 7800X3D 8-Core, 16-Thread Desktop Processor Was $449 Now $341
- ASUS RTX™ 5060 OC Edition Graphics Card Was $379 Now $339
- LG 77-Inch Class OLED evo AI 4K C5 Series Smart TV Was $3,696 Now $2,796
- Intel® Core™ i7-14700K New Gaming Desktop Was $320.99 Now $274
- Lexar 2TB NM1090 w/HeatSink SSD PCIe Gen5x4 NVMe M.2 Was $281.97 Now $214.98
- Apple Watch Series 10 GPS + Cellular 42mm case Smartwatch Was $499.99 Now $379.99
- ASUS ROG Strix G16 (2025) 16" FHD, RTX 5060 gaming laptop Was $1,499.99 Now $1,274.99
- Apple iPad mini (A17 Pro): Apple Intelligence Was $499.99 Now $379.99
*Prices and savings subject to change. Click through to get the current prices.
Using A Range Of Cells
If you already have the data inputted on your Google Sheet spreadsheet then you can select it and then decide where you want to put the drop-down list.
Step
Select Cells
First, ensure the right amount of cells for your drop-down list to contain.
For instance, maybe you want to select four months in the middle of the year and allow four people to choose which month is their favorite to go on a summer vacation. With that in mind, the drop-down list will need a total of four cells.
Step
Data Validation
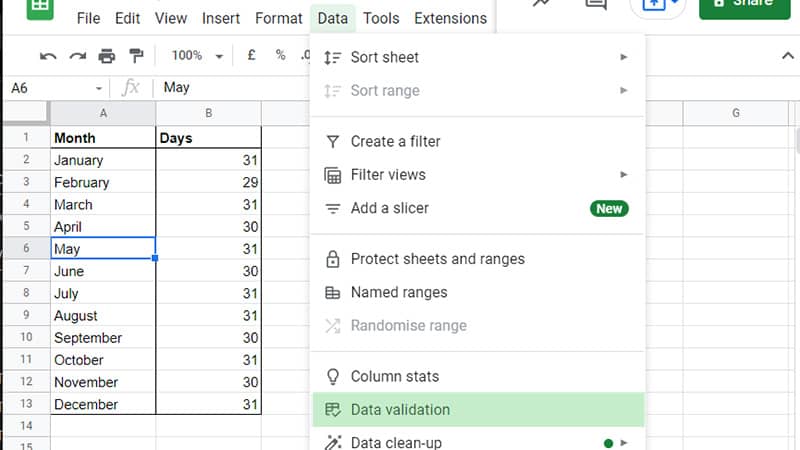
Click on the ‘Data' option, then click on ‘Data validation' in the menu that appears.
Step
Data Validation Dialog Box
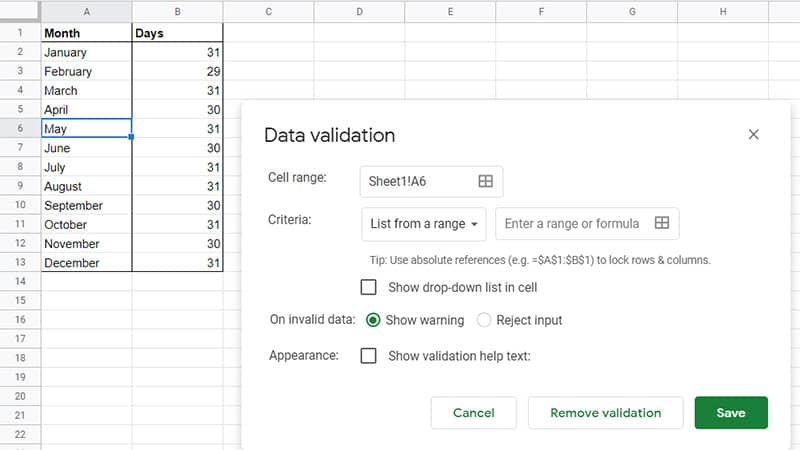
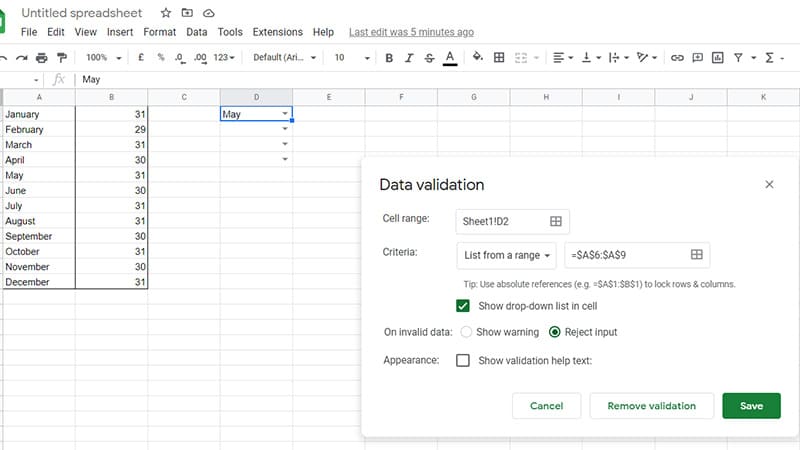
The ‘Data validation' dialog box should open and here you can dictate the data you want to include and where you want it to appear on your spreadsheet.
Step
Select A Data Range
To select the range of cells where you want the answers to come from in your drop-down list, simply highlight the cells as you would normally.
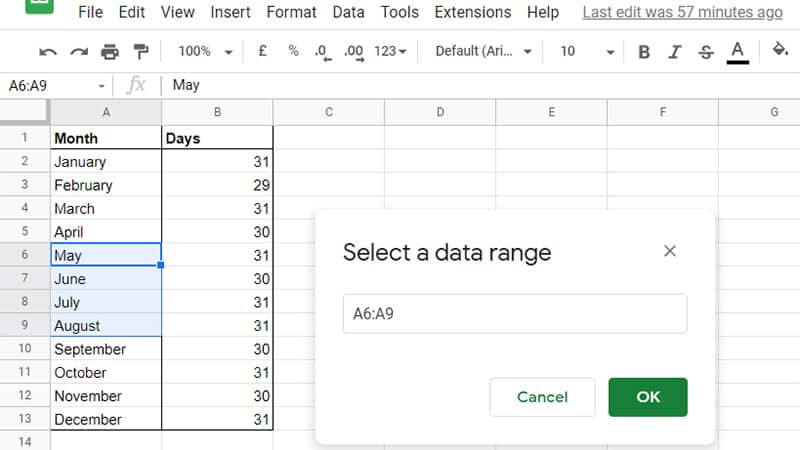
For instance, click on May then drag down until May, June, July, and August are all selected. You should notice that the ‘Select a data range' dialog appears with the range you selected which includes cells A6 to A9, in this case, known as A6:A9.
Step
Select A Cell
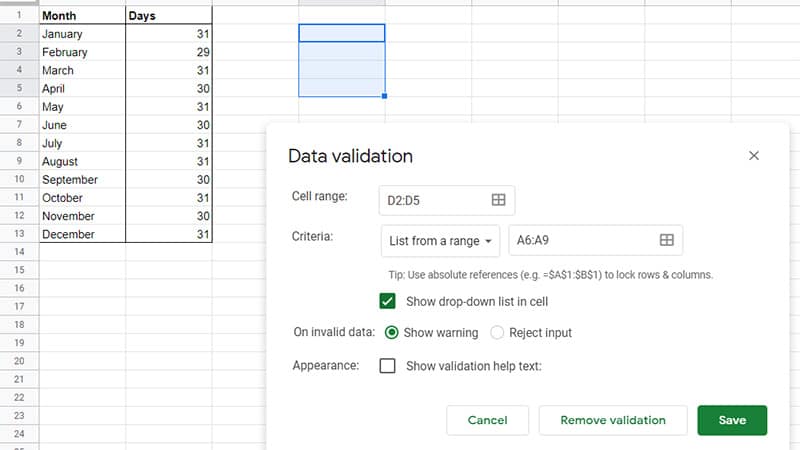
Click ‘OK' and your range of choices has been created in the Criteria field as a list from a certain range.
You still need to select where you want the drop-down list to select an empty cell in your spreadsheet and drag it down until you have selected a total of four cells.
In this case, we will choose the cell range of D2 to D5 (D2:D5) so select D2 then drag it down to highlight the cells below to D5.
Step
Save
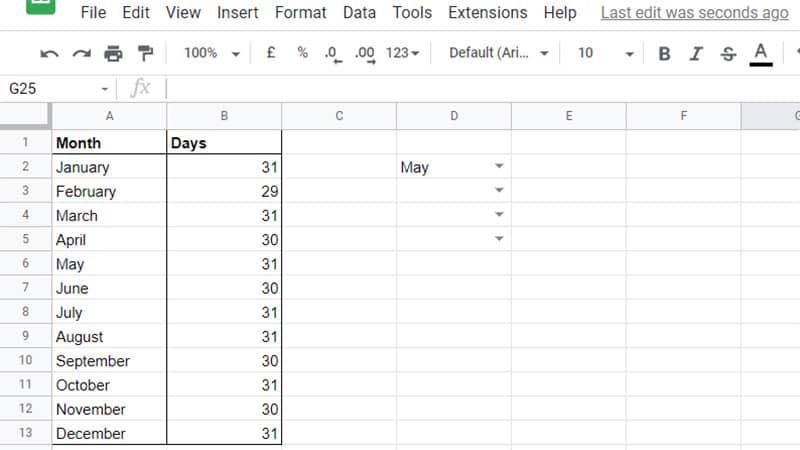
Click ‘Save' and you will notice that the four cells now have a downward arrow on each one.
Step
Drop Down Options
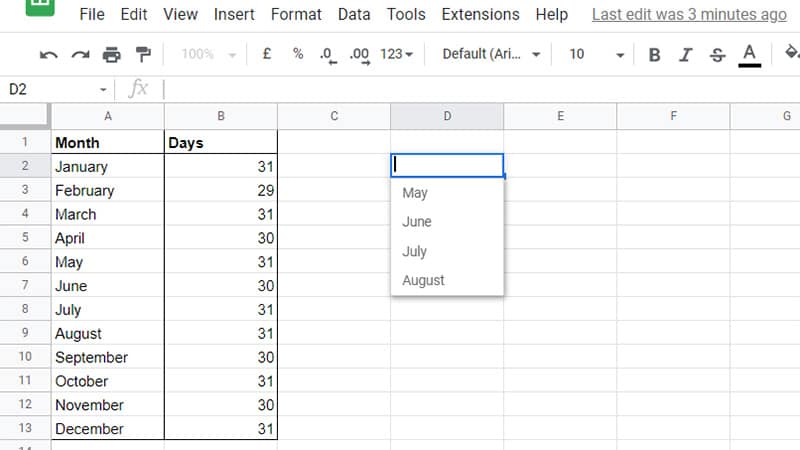
When you select an individual cell, you can select one of four options; the four months that you selected as your pre-defined criteria.
Step
Select From Options
In those cells, you can either select from one of the options or type it in.
Step
Error
Due to deciding what the criteria was, the data validation should only allow you to answer within one of those months.
If you want to answer that September is your favorite summer month then it may allow you to type it in but the answer will not be valid as it is not in the specified range that you already defined.
The cell will also be highlighted with a red triangle to display the error.
Step
Select From Pre-Defined Options
When you do select one of the pre-defined options, the data validation will allow you to let that answer remain. In this case, May has been chosen as one of the answers.
Step
Disable Input Option
If you do not want anyone to be allowed to type in their answer then you can disable this option. In the Data Validation settings, you can select ‘Reject input option' in the ‘On invalid data' option instead of simply showing a warning.
Creating Drop-Down List In Google Sheets
By creating a drop-down list, you can make your data consistent and manageable. This is handy if you only want certain answers to apply, for instance in a survey.
This narrows down the available options and you can even make sure that users are notified when their answer is invalid.

