
How to control your GPU fan speed – 2 methods (with pictures)

Table of Contents
If you want to learn how to control GPU fan speed, then we’ve got you covered right here.
While many people prefer to let their system handle their GPU’s fan speeds, taking control yourself can be beneficial. This is because adjusting the speed can aid in temperature regulation, noise reduction, and even performance optimization. Additionally, by managing temperatures through fan speed control, you can avoid GPU overheating issues.
Prime Day is finally here! Find all the biggest tech and PC deals below.
- Sapphire 11348-03-20G Pulse AMD Radeon™ RX 9070 XT Was $779 Now $739
- AMD Ryzen 7 7800X3D 8-Core, 16-Thread Desktop Processor Was $449 Now $341
- ASUS RTX™ 5060 OC Edition Graphics Card Was $379 Now $339
- LG 77-Inch Class OLED evo AI 4K C5 Series Smart TV Was $3,696 Now $2,796
- Intel® Core™ i7-14700K New Gaming Desktop Was $320.99 Now $274
- Lexar 2TB NM1090 w/HeatSink SSD PCIe Gen5x4 NVMe M.2 Was $281.97 Now $214.98
- Apple Watch Series 10 GPS + Cellular 42mm case Smartwatch Was $499.99 Now $379.99
- ASUS ROG Strix G16 (2025) 16" FHD, RTX 5060 gaming laptop Was $1,499.99 Now $1,274.99
- Apple iPad mini (A17 Pro): Apple Intelligence Was $499.99 Now $379.99
*Prices and savings subject to change. Click through to get the current prices.
As the process can be confusing for both new and old users, we’ll go over two methods that can help you quickly adjust your GPU fan speeds.
Quick Answer
To control your GPU’s fan speed, launch MSI Afterburner > click on the Lock icon > go to properties > enable automatic fan control > set Fan Speed Curve to custom > use individual points to adjust the speed.
How to control GPU fan speed using MSI Afterburner
To control your GPU’s fan speed, you’ll need to rely on third-party software. And for this purpose, the first one we recommend is MSI Afterburner. This is a great software with a well-designed interface, so you won’t have a problem navigating through it.
Step
Download the software
First, download MSI Afterburner from the official website of MSI and install it in your system.
Step
Unlock the save option
Once installed, launch the software and wait for it to open. Then, click on the Lock icon to unlock the save option. Without it, you won’t be able to save your custom fan speed settings.
Step
Access the properties
Go to the software’s properties, which can be done by clicking on the gear icon on the left side.
Step
Enable and adjust the fan settings
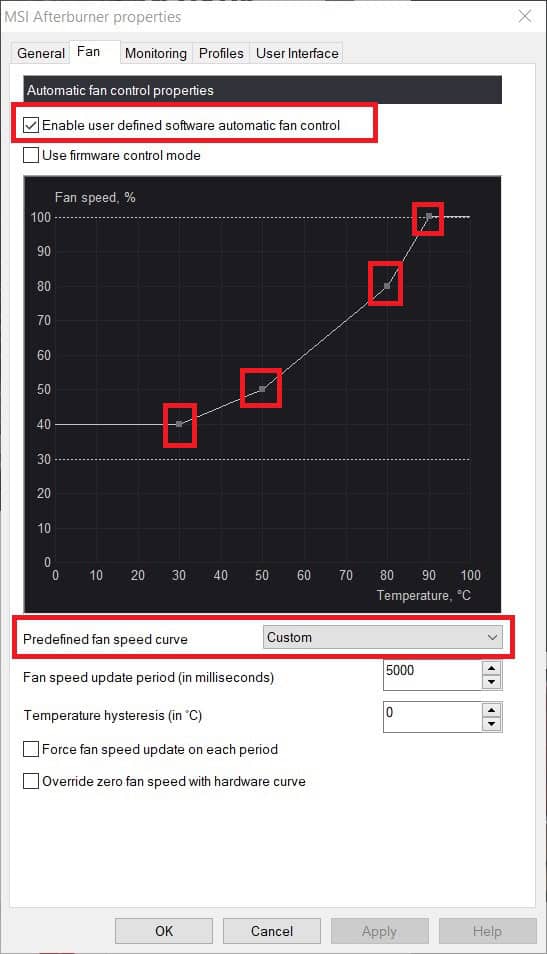
In the properties, go to the ‘Fan’ tab and check the box next to ‘Enable user defined software automatic fan control.’ Then, set the ‘Predefined fan speed curve’ to custom. Once done, you can click and drag the points in the chart to adjust the fan speed. If you want the fans to spin at the slowest speed, bring all the points down.
Step
Save the settings
Now, go back to the main menu and click on the save icon to save your custom settings.

You can then select another profile by clicking on 2,3,4, or 5, and save custom settings for these too. This way, you can quickly adjust the fan speed without messing around with the settings too much.

How to control GPU fan speed using EVGA Precision
Another software that we’d recommend is EVGA Precision, and this one is also fairly easy to use.
Step
Download and install
First, go to the official website of EVGA and download the Precision software from there. Then, start the installation process and wait for it to complete.
Step
Launch the software and adjust the settings
Open EVGA Precision and select a profile from the right side, ideally ‘1.’
Once done, click on the ‘Auto’ icon in the Fan Speed section, and use the sliders to adjust the speed of each fan.

You can also click on the arrow button on the right side of the Fan Speed section to open the Temp Tuner chart, which you can control by dragging individual points.

Step
Save the settings
After adjusting the settings, click on Apply, and then click on Save. You can then choose another profile and adjust the settings for it.
Conclusion
As you can see for yourself, controlling your GPU fan speed isn’t a difficult task if you have the right software. Such features can help you control the temperature and even the noise coming from the GPU. For instance, if you want it to operate quietly, you can bring the fan speed down, but make sure not to do this during GPU-intensive tasks.
About the Author