
How To Freeze Rows In Excel

Reviewed By: Kevin Pocock

Table of Contents
Spreadsheets can be difficult at the best of times, and you need to be able to frequently compare two different sets of data at any one time.
But when hundreds of rows are involved, things can become complicated. But there’s one simple solution: freeze the rows on screen.
Prime Day is finally here! Find all the biggest tech and PC deals below.
- Sapphire 11348-03-20G Pulse AMD Radeon™ RX 9070 XT Was $779 Now $739
- AMD Ryzen 7 7800X3D 8-Core, 16-Thread Desktop Processor Was $449 Now $341
- ASUS RTX™ 5060 OC Edition Graphics Card Was $379 Now $339
- LG 77-Inch Class OLED evo AI 4K C5 Series Smart TV Was $3,696 Now $2,796
- Intel® Core™ i7-14700K New Gaming Desktop Was $320.99 Now $274
- Lexar 2TB NM1090 w/HeatSink SSD PCIe Gen5x4 NVMe M.2 Was $281.97 Now $214.98
- Apple Watch Series 10 GPS + Cellular 42mm case Smartwatch Was $499.99 Now $379.99
- ASUS ROG Strix G16 (2025) 16" FHD, RTX 5060 gaming laptop Was $1,499.99 Now $1,274.99
- Apple iPad mini (A17 Pro): Apple Intelligence Was $499.99 Now $379.99
*Prices and savings subject to change. Click through to get the current prices.
This means keeping a particular row in a secure, fixed location while you can still scroll up and down (or side to side) through the rest of the spreadsheet.
There are two ways to do this: You can freeze a set of rows on your spreadsheet, or you can freeze the first visible row.
Either way, it’s not a particularly difficult skill to learn – provided you abide by our easy-to-follow guide.
Why Is This Function Useful?
Freezing rows in an Excel spreadsheet means that you are able to keep the characters inside the cells visible even as you scroll through the sheet to look at your other values. It is essentially a way of seeing lots of data on the sheet all at one time.
Freeze A Set Of Rows
If you choose to use this option, then you will actually be freezing all the rows from the top of the sheet down to the row you intend to freeze.
In simple terms: it's impossible to freeze a single, random row located in the middle of your spreadsheet without also locking everything above it.
Step
Click A Row
Click on the row that is located below the set of rows you want to freeze.
Step
Click View Tab
In the main menu, click the View tab.
Step
Freeze Panes
Then move your cursor to where it says Freeze Panes in the ribbon and navigate to the Freeze Panes option directly underneath. This should appear in a drop-down menu.
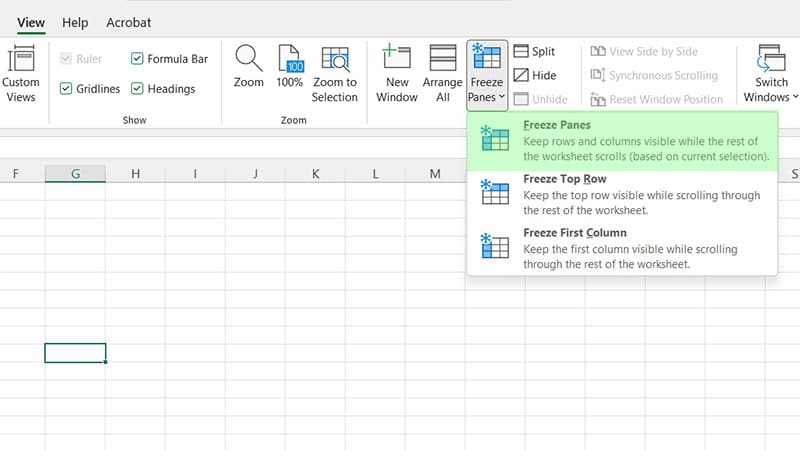
If you’ve been successful in carrying out this method, then you should be able to scroll through the content of your sheet while also continuing to view the frozen cells in the first couple of rows.
Freeze The Top Row
This doesn’t have to be the literal top row in your spreadsheet. Instead, following this command lets you freeze the first visible row.
Step
Scroll Through Your Spreadsheet
Scroll through your spreadsheet until the row you want to freeze is the first row that can be seen under the row of letters.
Step
Click View Tab
Then, in the main menu, click the View tab.
Step
Freeze Top Row
Next you need to navigate to the ribbon, select Freeze Panes, and then click on the Freeze Top Row option.
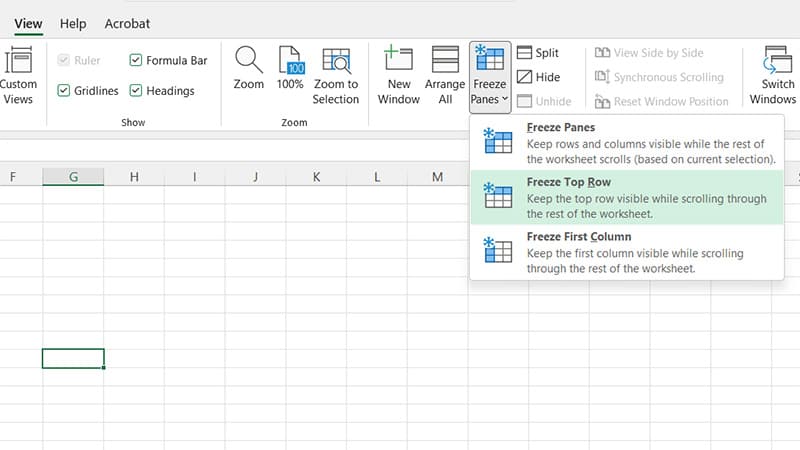
This will lock the first row so it remains visible when you are looking through the rest of the sheet. You’ll also be able to tell whether the top row is frozen or not as a gray line will remain below it.
Unfreeze A Row
If you’ve successfully managed to freeze a row but want to undo your actions, you need to follow just a few simple steps.
Step
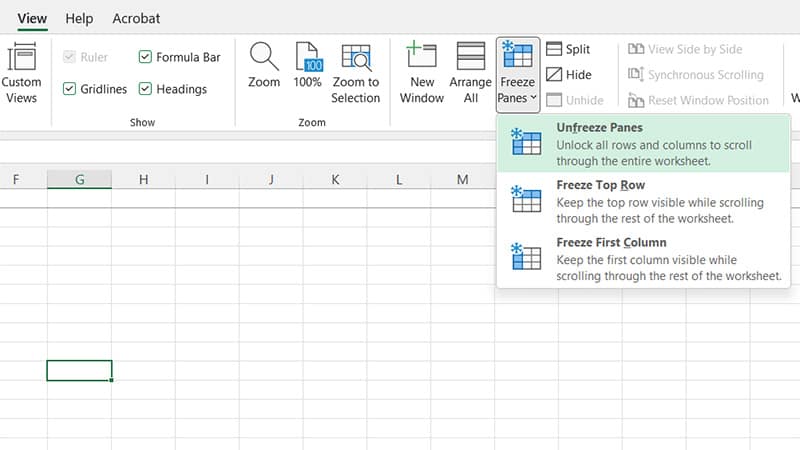
Click On Unfreeze Panes
Simply return to the Freeze Panes menu in the ribbon (under the View tab) and choose Unfreeze to toggle the locked row.
Important Information
- It’s important to note that Excel doesn’t limit the number of rows you can freeze at any one time which can be an extremely handy tool when dealing with larger spreadsheets.
- Microsoft Excel only allows you to freeze rows that are located at the top of the spreadsheet. It is impossible to lock rows in the middle of the sheet.
- All rows you intend to lock must be visible at the moment of freezing. If the rows are out of view, they will be hidden after freezing.
Conclusion
That concludes our list of ways to freeze rows in Excel. And yes, it really is that straightforward! As long as you follow the steps accurately then you’ll be on your way to conveniently combing through large amounts of spreadsheet data in little to no time at all.
About the Author