

Table of Contents
Microsoft Word can be used for many things. It's not just a tool for writing documents.
If you're willing to go a step further with it, you can create some really great documents that are quite appealing to the eye.
Prime Day is finally here! Find all the biggest tech and PC deals below.
- Sapphire 11348-03-20G Pulse AMD Radeon™ RX 9070 XT Was $779 Now $739
- AMD Ryzen 7 7800X3D 8-Core, 16-Thread Desktop Processor Was $449 Now $341
- ASUS RTX™ 5060 OC Edition Graphics Card Was $379 Now $339
- LG 77-Inch Class OLED evo AI 4K C5 Series Smart TV Was $3,696 Now $2,796
- Intel® Core™ i7-14700K New Gaming Desktop Was $320.99 Now $274
- Lexar 2TB NM1090 w/HeatSink SSD PCIe Gen5x4 NVMe M.2 Was $281.97 Now $214.98
- Apple Watch Series 10 GPS + Cellular 42mm case Smartwatch Was $499.99 Now $379.99
- ASUS ROG Strix G16 (2025) 16" FHD, RTX 5060 gaming laptop Was $1,499.99 Now $1,274.99
- Apple iPad mini (A17 Pro): Apple Intelligence Was $499.99 Now $379.99
*Prices and savings subject to change. Click through to get the current prices.
One of the features you can use in Microsoft Word is its horizontal lines.
While on the surface, this might seem a bit anticlimactic, it's actually a really good feature for separating big bodies of text and overall, it just makes the document you're writing easier to read.
But how do you add these lines in Microsoft Word? Well, read on to find out!
Insert A Line (The Fast Way)
There is actually more than one way you can insert a line in Microsoft Word. This option is by far the fastest way.
This method is called the AutoFormat feature. Certain characters in Microsoft Word are designed to be able to change into lines:
Step
Put The Cursor On The Line
Put the cursor on the line where you want the horizontal line.
Step
Type Three Of These Characters And Press Enter
Type three of these characters (picture below) and press Enter.
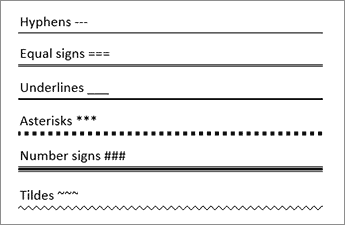
As soon as you press enter, the line will be added automatically and will look like whichever character you typed in three times.
The line extends to the full width of the page. If you have any columns you're inserting the line to, it will match the width of the column rather than the page.
If you want to add any text above the line, just put the cursor above the line and begin typing.
This method is the quickest and easiest way to add a horizontal line to Microsoft Word.
Draw A Line
You can also draw lines in Word. They won’t look like the ones above, but if you're looking to add a bit more flair to your document, try this method too:
Step
Go To The Insert Tab
Go to the Insert tab and click Shapes.
Step
Now You Want To Click Lines And Select The Line That You Want
Now you want to click Lines and select the line that you want. You'll get these options:
![]()
Step
Decide What Location Of The Document You Want Your Lines To Be in
Decide what location of the document you want your lines to be in. Hold down on your mouse and drag the line there.
Inserting A Line Using Borders
This method lets you insert lines both horizontally and vertically using borders. This is another straightforward method, so just follow these steps:
Step
Select The Paragraph
First, you want to select the paragraph where you want the line to be.
Step
Click The Borders Button
On the Home tab, click the Borders button. By doing this, a line will appear under the paragraph.
Step
The Border Pattern Will Usually Be The Bottom Line On The Dropdown Menu
By default, the border pattern will usually be the bottom line on the dropdown menu. But don't worry, you can change it.
Step
Select The Arrow To Open The Dropdown Menu
On the Borders button, select the arrow to open the dropdown menu. You can now change the position of the line.
Step
You Also Have The Option Of “Borders And Shading”
You also have the option of “Borders and Shading” which is at the bottom of the menu. Here you can change the width, color, height, or style of the line.
Conclusion
Sometimes a huge wall of text can be quite daunting to begin reading, especially if there are lots of pages included in the document. But that's why lines are such a great feature for you to use.
Adding lines to your document couldn't be any easier. Microsoft Word generally likes to keep its features as simple and as accessible as possible, so you won't have any trouble when it comes to adding your lines.
Play around and experiment with this feature to work out what's best for your document.
Sometimes, a nice visual can really take a wall of text to new heights and help you get your overall document looking slick and clean!
About the Author
