How To Fix Windows 10 Search Not Working

Table of Contents
The Windows 10 search bar is one of the best additions to the operating system, allowing users to directly find options straight away rather than going through file explorer to search or look through countless directories.
Like most features though, the Windows 10 search not working can be an issue at times. However, the issue is normally software-based and easily rectified. If you've encountered the Windows 10 search not working, here are some easy troubleshooting steps to get it back up and running.
Prime Day may have closed its doors, but that hasn't stopped great deals from landing on the web's biggest online retailer. Here are all the best last chance savings from this year's Prime event.
- Sapphire Pulse AMD Radeon™ RX 9070 XT Was $779 Now $719
- AMD Ryzen 7 7800X3D Processor Was $449 Now $341
- Skytech King 95 Ryzen 7 9800X3D gaming PC Was $2,899 Now $2,599
- LG 77-Inch Class OLED C5 TV Was $3,696 Now $2,996
- AOC Laptop Computer 16GB RAM 512GB SSD Was $360.99 Now $306.84
- Lexar 2TB NM1090 w/HeatSink SSD Was $281.97 Now $214.98
- Apple Watch Series 10 GPS+ Smartwatch Was $499.99 Now $379.99
- AMD Ryzen 9 5950X processor Was $3199.99 Now $279.99
- Garmin vívoactive 5 Smartwatch Was $299.99 Now $190
*Prices and savings subject to change. Click through to get the current prices.
How To Fix Windows 10 Search Not Working
Basic Troubleshooting

First, try performing the following tasks: Restart your PC/Laptop/Tablet, Check Your Network Connection (disconnect and connect) and Turn Cortana On/Off If Enabled. All three of these steps normally solve the issue. Failing that, go to the next troubleshooting steps for Windows 10 search not working.
Run Windows 10 Troubleshooter
This isn't a guaranteed fix, but it can give you a good idea of where the Windows 10 search not working fault lies.
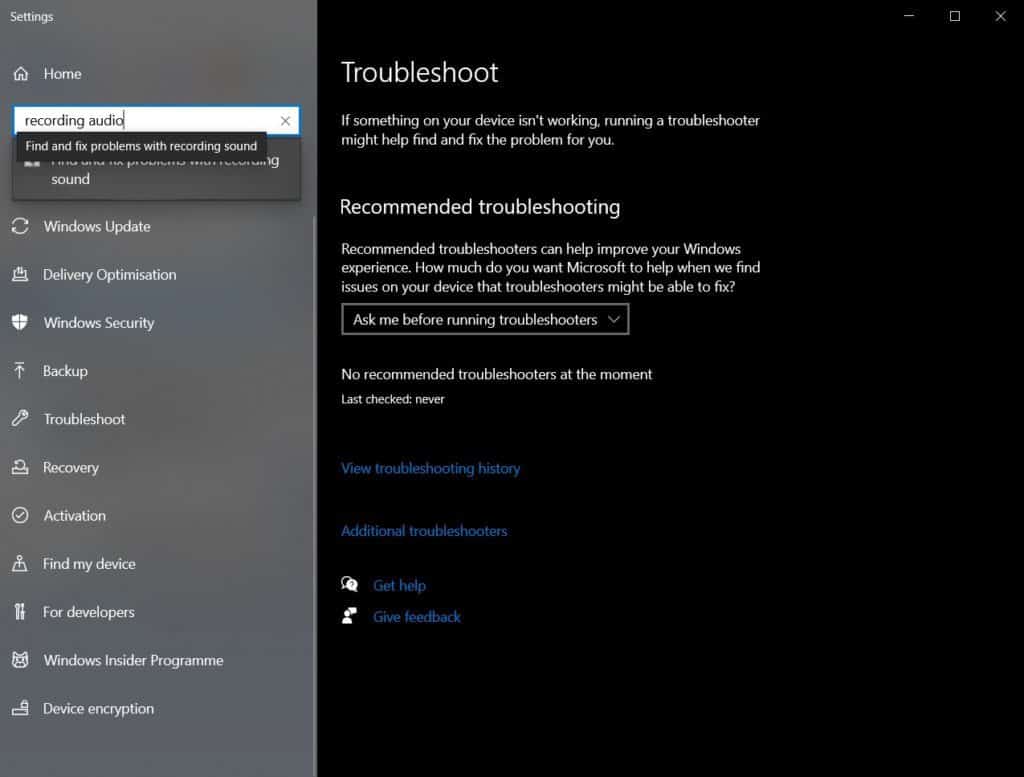
Navigate to Windows Troubleshooter
Follow the following steps after opening the start menu: Settings (Cog) > Update and Security > Troubleshoot > Search and Indexing (You may have to search for this in the provided search bar). Finally, click ‘Run' so that Windows 10 can try and fix the issue for you.
Check Services
For one reason or another following an important update, or by user error, Windows Search has been disabled and is no longer running.
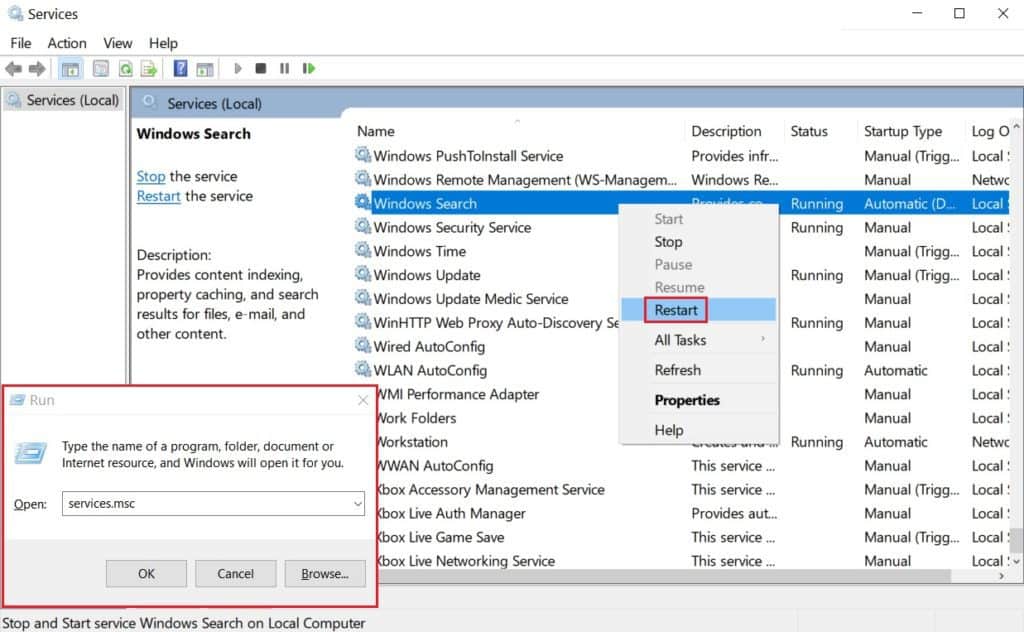
Open The Services Window
There are a few ways to open up the Services window, but hitting the Windows key + R to open up a Run window is normally the quickest. Type ‘services.msc' and click ‘OK'. Once in, have a look for the ‘Windows Search Service', right-click it then go for ‘Restart'
Rebuild Windows 10 Search Indexing
Windows automatically saves your search history and indexes the files and folders you search for the most. Sometimes said index can corrupt and lose these locations.
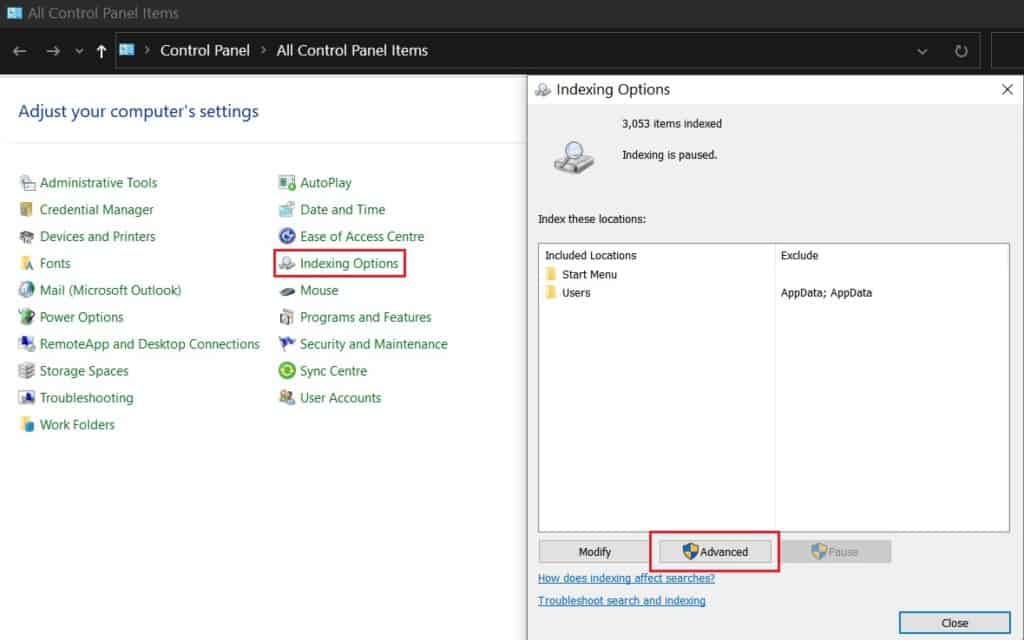
Go To Indexing Options
This is in Control Panel. Go to Settings (COG) > Search ‘Control Panel' > Indexing Options.
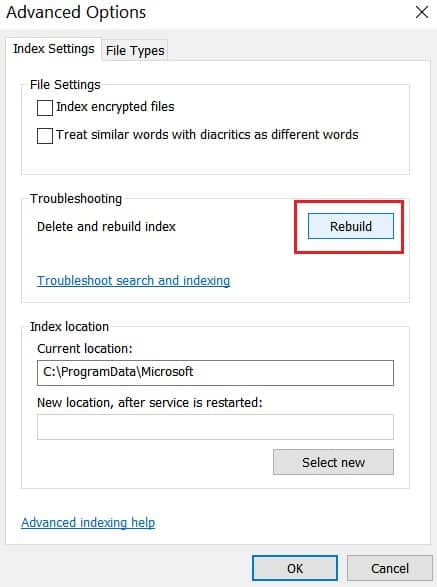
Rebuild Index
Once In ‘Advanced Options', Click the ‘Rebuild' button under Troubleshooting.
If none of the above troubleshooting works, consider resetting Windows 10 to an earlier point before Windows 10 search not working issues started. For more troubleshooting guides for Windows 10, bookmark us here at PCGuide.


