
How to Screenshot on Windows 11

Reviewed By: Kevin Pocock

Table of Contents
When you want to keep a record of information displayed on your Windows 11 computer or share what you're seeing on your screen with friends or on social media, it can be useful to take a screenshot of your computer screen. There are a bunch of different ways you can capture a screenshot on Windows 11, depending on exactly what you're trying to do, and with different implementations.
Read on for our guide to the different options for taking screenshots on your Windows 11 computer.
Prime Day may have closed its doors, but that hasn't stopped great deals from landing on the web's biggest online retailer. Here are all the best last chance savings from this year's Prime event.
- Sapphire Pulse AMD Radeon™ RX 9070 XT Was $779 Now $719
- AMD Ryzen 7 7800X3D Processor Was $449 Now $341
- Skytech King 95 Ryzen 7 9800X3D gaming PC Was $2,899 Now $2,599
- LG 77-Inch Class OLED C5 TV Was $3,696 Now $2,996
- AOC Laptop Computer 16GB RAM 512GB SSD Was $360.99 Now $306.84
- Lexar 2TB NM1090 w/HeatSink SSD Was $281.97 Now $214.98
- Apple Watch Series 10 GPS+ Smartwatch Was $499.99 Now $379.99
- AMD Ryzen 9 5950X processor Was $3199.99 Now $279.99
- Garmin vívoactive 5 Smartwatch Was $299.99 Now $190
*Prices and savings subject to change. Click through to get the current prices.
How to Screenshot on Windows 11
Below, there are a few different ways you can screenshot on Windows 11. Pick your favorite and off you go!
Via Snipping Tool
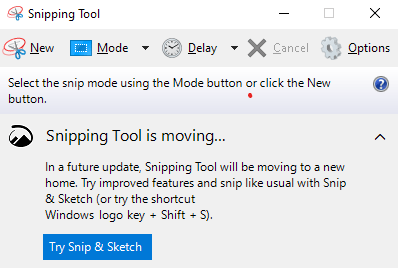
The Windows 11 Snipping tool is a handy straightforward tool for capturing either the entire contents of your screen, a specific open Window, or manually selected individual sections.
You can find the Snipping tool via the Start Menu or by searching for it, and once you've taken a snapshot, you can either save it to your computer or copy it to your clipboard.
The Snipping Tool has been around since Windows Vista, but even though it’s old, for the time being, it does the job. However, Microsoft already has a replacement for the Snipping tool in place (which is the next method on this list) so there's no telling when the Snipping Tool is going to be retired in future Windows 11 operating system updates.
Via Snip & Sketch
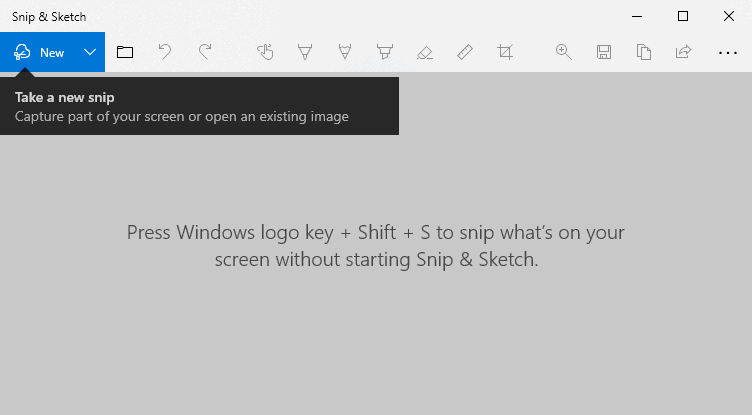
This is the successor to the Snipping tool, built for Windows 11. For the time being, both options coexist on Windows 11, but Microsoft says at some point they will move to only offering Snip & Sketch.
It offers much the same functionality as the Snipping Tool, but it's packaged up a bit more nicely and integrates well with the Windows 11 notification UI. It's a cleaner and more polished app, and it matches the core functionality of its predecessor.
You get the same option for capturing the entire screen, a specific window, or manually capturing a specific area. Once captured, your image is automatically copied to your clipboard for use elsewhere, or you can open the image to save it elsewhere, or even add annotations.
You can launch it with the keyboard shortcut “Windows Key + Shift + S”, which isn't the easiest set of keys to hit at the same time without a bit of practice. You could also launch it from the Start menu.
It's a solid successor to the useful Snipping tool, and even if it's a somewhat odd decision for Microsoft to limit the options going forward, I don't think anyone will feel like they've been left high and dry without the Snipping Tool.
Via Print Screen
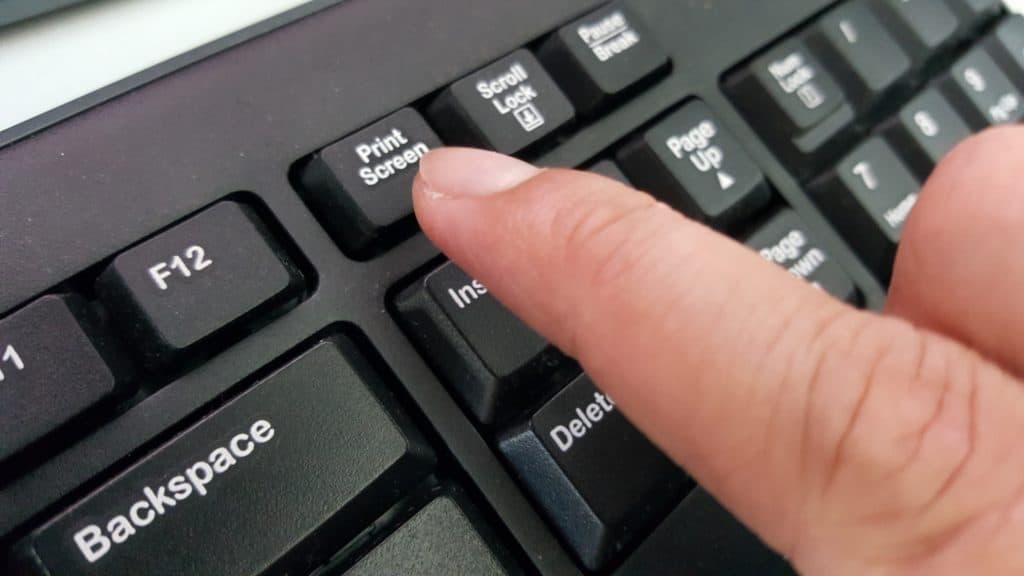
A basic Windows function that is likely not going anywhere any time soon. This is considered such a staple OS function that nearly all Windows keyboards have a dedicated button for it.
Pressing the “PrtSc” button on your keyboard will instantly take a screenshot of whatever is on your screen at that moment. That screenshot will then be copied to your clipboard, for you to use wherever you want. There's no way to just select a certain area of your screen, and if you put something else on your clipboard before saving the image you'll lose, but the convenience of having a button specifically for this task is pretty handy.
Via Windows + PrtSc
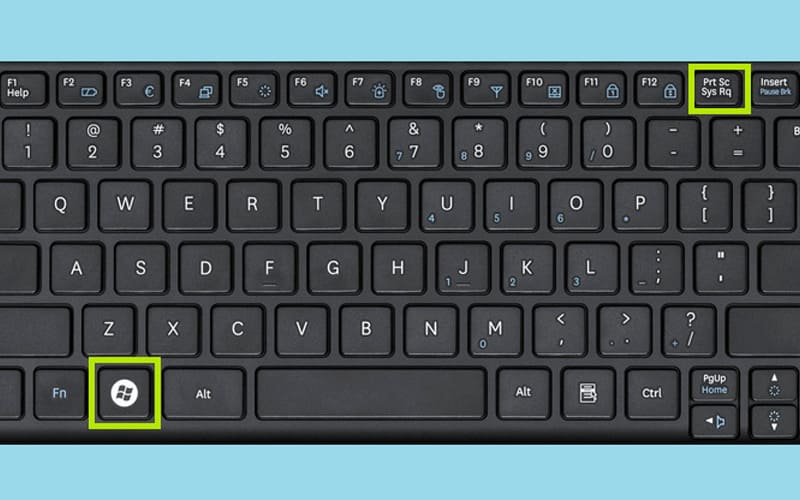
There is a modifier for the classic Print Screen function, where if you press the Windows button whilst pressing PrtSc, rather than copying the image to your clipboard. Pressing “Windows + PrtSc” will save the image to your “PicturesScreenshots” folder.
This is particularly if you want to take a lot of screenshots in rapid succession since you don't have to manually save each one before taking the next.
Via Xbox Game Bar
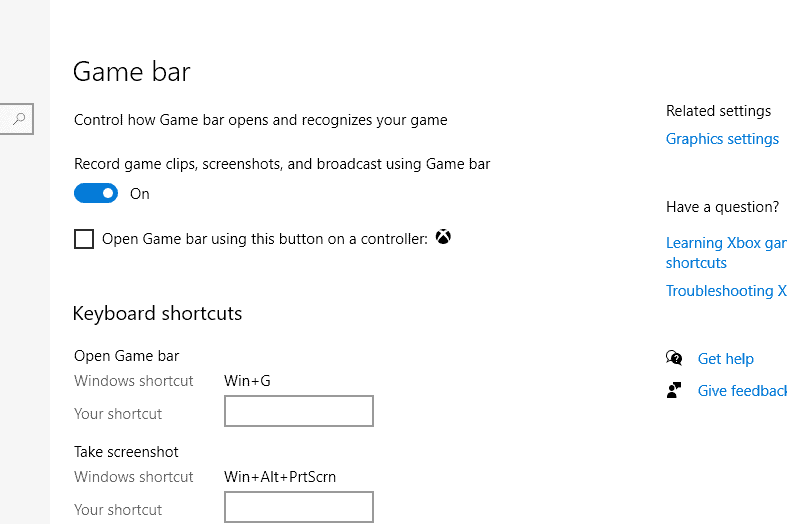
The Xbox Game bar is Microsoft's gaming focussed overlay, that I generally just keep turned off. I've always been able to play games perfectly fine without needing it. Perhaps if you play a lot of Microsoft games, or if you're subscribed to Xbox Game Pass, it makes more sense to be an app that is in your regular rotation.
Although it is a gaming app, it also has a few capture functionalities that work for gaming or non-gaming purposes.
You can use it to take still screenshots, or record video clips, of either games or whatever else you've got on your screen.
It will synchronize the library of your captures with those taken from your Xbox console if you have one, and even has a built-in “meme” creator if you want to turn a screenshot of an unsuccessful round of Minesweeper into a piece of social media-friendly political commentary. It also has Twitter integration to directly share your captures with your followers.
Whether this is a sensible solution for you probably depends on whether you're already actively using this app. I wouldn't recommend deliberately seeking it out just to take screenshots, but the screenshot functionality is perfectly adequate if you're already using it.
Let us know your preferred method of capturing screenshots from Windows, and what types of tasks you use the functionalities for in the comments section.
About the Author