
How to lower CPU usage in just a few simple steps

Table of Contents
If you were wondering how to lower CPU usage, you've come to the right place.
A processor running at 100% capacity at all times results in decreased overall performance and can even reduce its life expectancy. Constant stuttering while you're working or gaming or just a slow boot-up can be frustrating.
Prime Day is finally here! Find all the biggest tech and PC deals below.
- Sapphire 11348-03-20G Pulse AMD Radeon™ RX 9070 XT Was $779 Now $739
- AMD Ryzen 7 7800X3D 8-Core, 16-Thread Desktop Processor Was $449 Now $341
- ASUS RTX™ 5060 OC Edition Graphics Card Was $379 Now $339
- LG 77-Inch Class OLED evo AI 4K C5 Series Smart TV Was $3,696 Now $2,796
- Intel® Core™ i7-14700K New Gaming Desktop Was $320.99 Now $274
- Lexar 2TB NM1090 w/HeatSink SSD PCIe Gen5x4 NVMe M.2 Was $281.97 Now $214.98
- Apple Watch Series 10 GPS + Cellular 42mm case Smartwatch Was $499.99 Now $379.99
- ASUS ROG Strix G16 (2025) 16" FHD, RTX 5060 gaming laptop Was $1,499.99 Now $1,274.99
- Apple iPad mini (A17 Pro): Apple Intelligence Was $499.99 Now $379.99
*Prices and savings subject to change. Click through to get the current prices.
That said, there are a couple of ways to resolve the high CPU usage issue, and we've listed all of them in our easy-to-follow guide to help your setup return to its former glory. So, without wasting another second, let's get right into it.
Quick Answer
You can lower the CPU usage by cleaning out your casing to avoid overheating, performing a system restore, updating your device drivers, updating windows, and scanning for viruses and malware.
Why is my CPU usage so high?
High CPU usage can be frustrating, resulting in stuttering, lag, and slow processing. This happens due to the CPU trying to process more instances than it can handle or due to a bottleneck, and you see your CPU being used 100% in the task manager. A couple of reasons for this happening are:
- Malware or a virus
- Resource-intensive processes running simultaneously
- Background processes silently taking up resources
- Overheating
Here’s how to lower your CPU usage
Here are a few methods that can help you quickly fix the high CPU usage issue.
Step
Close programs taking up too many resources
The first step before proceeding to the other steps is to check which program is causing your CPU to be used 100% and close it, depending on whether it is wanted or not. Here is how to do it.
- Right-click on the taskbar and select “Task Manager” from the pop-up manager, or press “Windows key + Q” and type “Task Manager” and hit enter.
- This will open up the task manager.

- Check if the CPU column has an arrow pointed upward or downward. This tells you if the programs are listed in ascending or descending order of usage. A downward arrow means that the program using the most resources will be at the top, which is what you want.
- If you're not using that program, click on it and click “End Task” at the bottom right corner. You can also right-click on it and select “End Task” to close it.

- This should lower CPU usage and give you back some of the performance.


Step
Scan for viruses and malware
A virus, malware, or miner could be the reason your CPU is always being used at its full capacity, resulting in slow overall processing. However, this should be easy to detect and fix, and here is how you can do it.
- Press “Windows Key + Q” and type in “Windows Security.”
- Click on “Virus & threat protection.”

- Click on “Scan options.”

- Select “Full scan” and wait for it to be completed. If there is malware, viruses, or mining software, this should detect them, and then you can remove them from your PC.
- You can also open the task manager, go through the running processes, and see if anything looks suspicious or if you don't remember installing it on your PC. It could be potential malware or mining software that is utilizing your CPU’s capabilities to its advantage. However, before removing it, do a Google search to see if it isn't essential Windows software.


Before scanning with Windows Defender, check for updates under “Virus & threat protection updates.”
Step
Update the drivers
Outdated drivers could be a reason for high CPU usage due to compatibility issues. That said, this is one of the easier fixes, as all you need to do is update the hardware drivers, and you're good to go.
- Press “Windows Key + Q,” type “Device manager,” and hit enter.
- A new window should open up that lists all the devices connected.

- Click on the devices to expand them.

- Right-click on them, select “Update driver,” and then “Search automatically for drivers.”

- This should start the search for the latest drivers on the internet and update them.


You can also visit the manufacturer's website and look for drivers for a particular device, such as dedicated graphics cards, download them, and select the “Browse my computer for drivers” option.
Step
Disable Windows notifications
A cause for high CPU usage could be the Windows notifications service running continuously in the background, and turning it off could result in lower CPU usage.
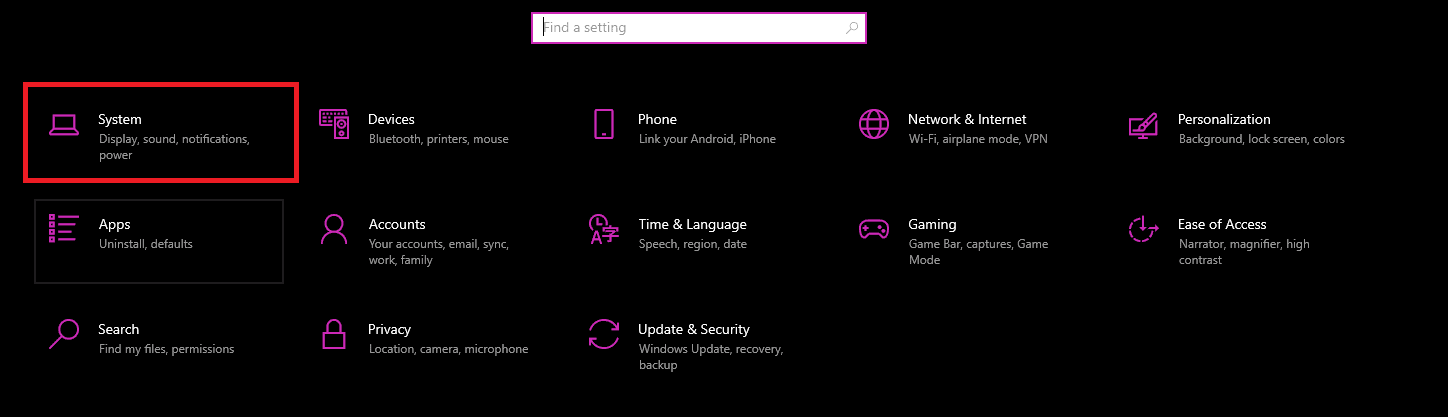
- Press “Windows Key + i” to open the control panel.
- Click on “System.”

- Navigate to “Notifications & actions” and toggle them off.

- After completing these steps, open the task manager and see if the CPU usage has reduced. If it hasn't, move on to the next step.

Step
Disable 3D wallpapers or other animations
If you have any software installed for animation or 3D wallpapers, they could be taking up resources, causing your CPU to work overtime. This is because applications like 3D wallpapers have to run constantly in the background to display moving objects or effects on your desktop. That said, simply uninstalling them could lower CPU usage and free up resources for other vital processes.
- Search for “Add or remove programs” in the taskbar and hit enter.
- This should open up a new window.
- Scroll down the list or search for the application in the search bar at the top.
- Select it and then click on “Uninstall.”


Step
Do a system restore
Performing a system restore could resolve the issue of high CPU usage as it'll take it back to a version where it was more stable, and any applications that might be causing this issue won't be there. Here is how you can do it:
- Press “Windows Key + Q” and type “System Restore” or “Create a restore point.”
- This will open another window, and select “System Restore.”

- Another window will open, which will take you through the next steps. Follow those steps, and you should be able to restore your system to a previous and more stable version.


Step
Update Windows
At times, a simple update can solve many issues, and in case of high CPU usage, an update could resolve software conflicts that might push your CPU to work more than it needs to. This is how you can update your Windows to the latest version.
- Press “Windows Key + I” to open the control panel
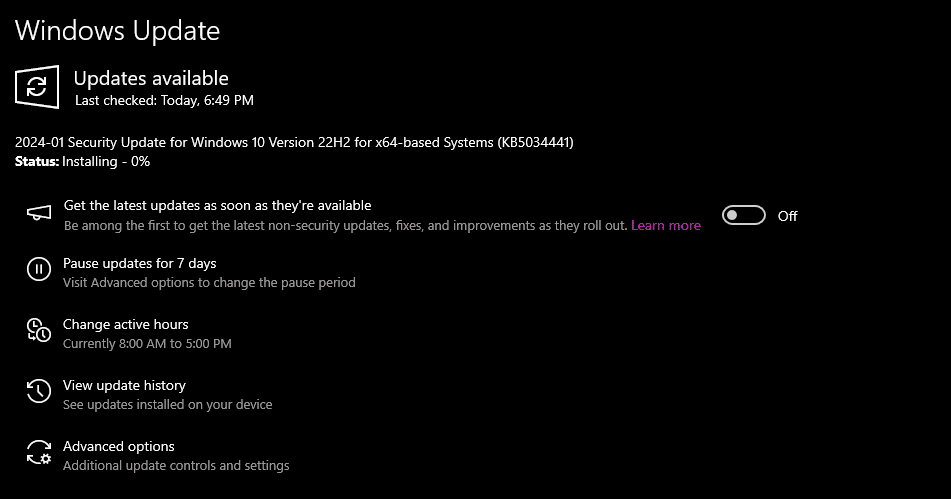
- In the search bar, type “Windows update.”
- Select “Check for updates” in the list of options, which should open a new window.

- Click on “Check for updates,” and if any are available, it will start installing.

- Wait for the process to complete, then check if your CPU has returned to normal operating levels.

Step
Clean your PC
Your CPU could be running at 100% due to overheating, which causes it to throttle. This is relatively easy to fix as all you need to do is open your casing, remove the components, blast them with air, clean them up with a rag, and put everything back together. You should also replace the thermal paste to ensure your CPU isn't overheating.
If you don't have the necessary tools, you can purchase them from Amazon. We recommend the following:
Besides that, if you're interested in upgrading your casing for better airflow or changing the thermal paste, we've got you covered with our best airflow PC case and the best thermal paste guides that have the top picks available.
Step
Replace your CPU
If none of these methods worked to lower your setup’s CPU usage, replacing the CPU might help to pinpoint the issue. If you have a friend who has a CPU that is compatible with your motherboard, replacing it with that could be beneficial to test whether there is an issue with your processor, motherboard, or cooling solution.
If it works fine, the issue is most likely in your CPU, and it might be time to replace it. However, suppose the other processor also ramps up to 100% usage. In that case, there is something potentially wrong with a conflicting component, and the only way to be sure of it is to replace and check each one individually. While this is a time-consuming process, it'll be worth it in the long run, and you'll learn more about how to maintain your setup better and the potential problems that could occur.
If you're interested in checking out potential upgrade options, head over to our CPU hub, which has options for various tasks, GPUs, motherboards, and more.
Wrapping up
This was everything about how to lower CPU usage, and as you saw, there are a handful of reasons that your CPU is running at 100% capacity. They can range from a dirty PC case to outdated drivers. However, these are all easy fixes, and by following the mentioned steps, your processor should be back to running at normal levels in no time.
After all that, if you think a new CPU would better serve you, then we recommend you check out these options.
-
High-end CPU
Intel Core i9-13900K

-
 Mid-range CPU
Core i5-13500
-
Budget CPU
AMD Ryzen 5 5600X
- Cores: 6
- Threads : 12
- Boost speed : up to 4.6 GHz
- Base speed: 3.7 GHz
- L3 Cache: 32 MB
- TDP: 65W


About the Author