How to change the administrator in Windows 11 – 6 easy methods


Table of Contents
Changing the administrator in Windows 11 is something you might need to do at some point. This is mostly done when you’re handing your PC over to someone else, or you just want to give another user more control over the system. Either way, even though the process sounds complicated, Windows 11 makes it pretty easy to switch or assign admin rights, as it can be done directly from the system settings.
However, even though the process is pretty simple, some users can still get confused with it, especially if they don’t know where to go. This is where we come in. We’ll walk you through a handful of methods that will help you change the administrator in no time!
Quick Answer
To change the administrator in Windows 11, you need to visit Settings > Accounts > Family or Other Users. From here, select the account you want to give administrator rights to and click on the ‘Change account type’ option.
How to change the administrator in Windows 11
Here are a few methods that can help you quickly assign administrative rights to another account in Windows 11.
Step
How to change the administrator in Windows 11 for Family Accounts
Changing the administrator in Windows 11 takes only a few minutes, and you can do it by following these steps:
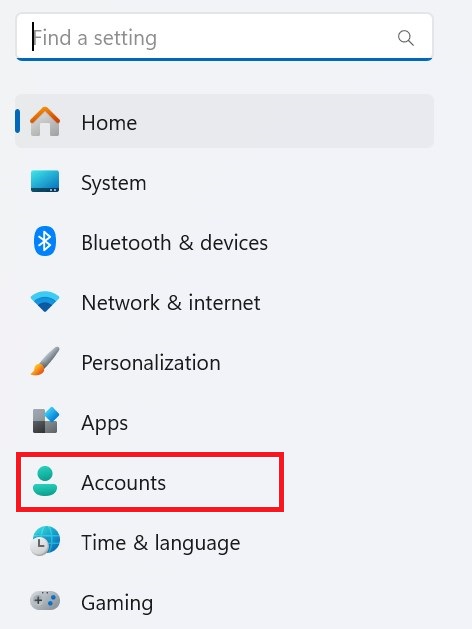
- Type ‘Settings' in the Windows Search Bar and click on the first option that appears.
- On the left side, click on ‘Accounts.'

Accounts option - Scroll down and click on ‘Family.' This is where you will find users that are linked to your Microsoft family group.

Family - Select the account you want to give administrator rights to from the ‘Your family' section.
- Click on ‘Change account type.'
- In the pop-up that will appear on the screen, click on ‘Standard User' and change it to ‘Administrator.'

Change account type


Here’s a quick video that walks you through the above method:
Step
How to change the administrator in Windows 11 for local users
If you want to give the administrative rights to a local user instead of one that is a part of your Microsoft family group, follow these steps:
- Go to the Settings and access ‘Accounts.'
- Scroll down and click on ‘Other Devices.' Here, you'll see all local accounts that are not a part of your Microsoft family group.

Other users - Select any of the local accounts.
- Click on ‘Change account type.'
- Click on ‘Standard User' and change it to ‘Administrator.'

Step
Alternate Method 1: Through User Accounts
Alternatively, you can try changing the administrator through the User Accounts menu by following these steps:
- Type netplwiz in the Windows Search Bar and press Enter.
- Select the user you want to make admin.
- Click on Properties.

- Go to the Group Membership tab.
- Choose Administrator.

Administrator option - Click Apply, then OK.


Step
Alternate Method 2: Through Command Prompt
The Command Prompt is one of the most useful programs in Windows. It allows you to perform different tasks through commands, such as letting you change the administrator in Windows 11. Here’s how:
- Type Command Prompt in the Windows Search Bar.
- Right-click on the Command Prompt and select ‘Run as administrator.
- Type this command: net localgroup administrators “UserName” /add (replace the UserName with the actual name of the user).

Command Prompt - Press Enter.
- If the command has been executed successfully, you'll see a message saying “The command completed successfully.”

Step
Alternate Method 3: Through PowerShell
PowerShell is yet another program which lets you perform different tasks using commands, and here’s how you can change the administrator through it:
- Type Command Prompt in the Windows Search Bar.
- Right-click on the Command Prompt and select ‘Run as administrator.
- Type this command: net localgroup administrators “UserName” /add (replace the UserName with the actual name of the user).

PowerShell - Press Enter.
- If the command has been executed successfully, you'll see a message saying “The command completed successfully.”

Step
Alternate Method 4: Through Control Panel
The Control Panel is yet another area from where you can change the administrator in Windows 11. This method can be followed if you’re unable to do it through the Settings app.
- Type Control Panel in the Windows Search Bar and press Enter.
- Scroll down and click on ‘User Accounts.’

User Accounts in Control Panel - Select the account you want to change.
- Click on ‘Change account type.’

Change account type - Select ‘Administrator.’

Select account type - Click on ‘Change Account Type.’


Why can’t I change the administrator in Windows 11?
If you can’t see the option to change the administrator in Windows 11, it could be because you’re not logged in with an administrator account. Only admins have the right to make these changes. Also, if you’re using a work or school PC, some settings may be locked by your company or school, including the option to change the administrator.
About the Author