
How to remove and apply thermal paste to a CPU or GPU – step-by-step guide (with pictures)

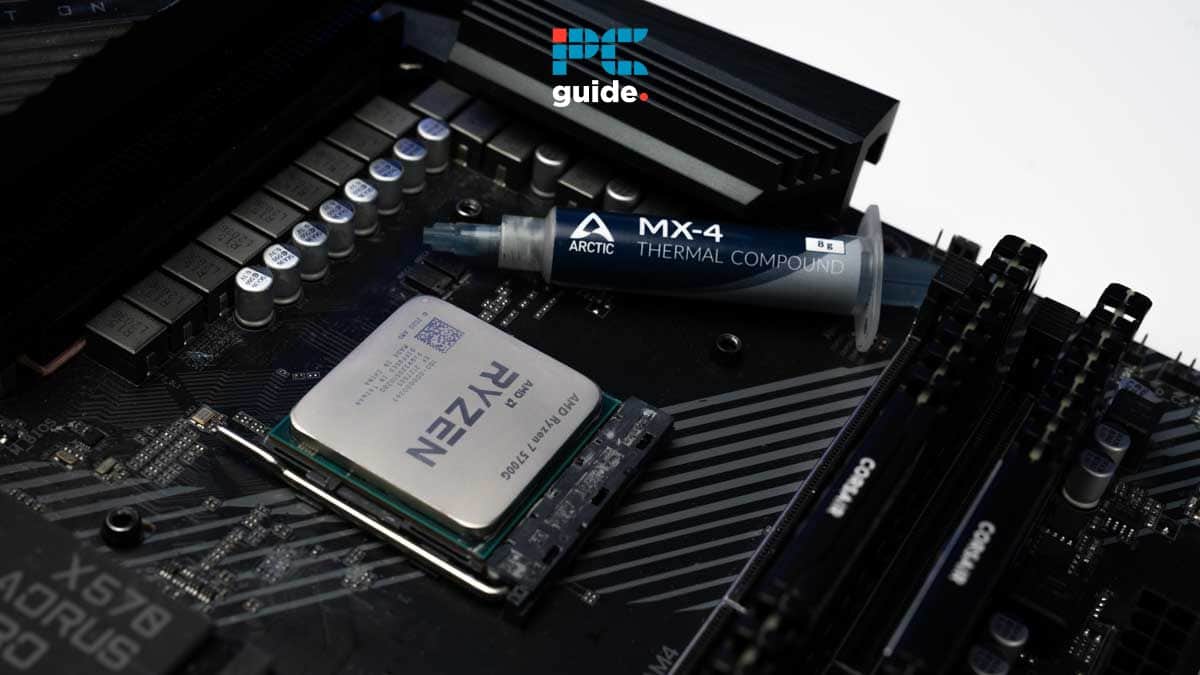
Table of Contents
If you want to learn how to apply thermal paste to a CPU or GPU, then our step-by-step guide has got you covered.
One of the simplest ways to revamp your computer and ensure your CPU/GPU maintains a good performance is by reapplying the thermal paste found on the IHS/heatsink. Thermal paste is an essential component of the cooling process in a CPU/GPU; allowing for an efficient transfer of heat to the cooler, which keeps temperatures below the thermal limit.
Prime Day is finally here! Find all the biggest tech and PC deals below.
- Sapphire 11348-03-20G Pulse AMD Radeon™ RX 9070 XT Was $779 Now $739
- AMD Ryzen 7 7800X3D 8-Core, 16-Thread Desktop Processor Was $449 Now $341
- ASUS RTX™ 5060 OC Edition Graphics Card Was $379 Now $339
- LG 77-Inch Class OLED evo AI 4K C5 Series Smart TV Was $3,696 Now $2,796
- Intel® Core™ i7-14700K New Gaming Desktop Was $320.99 Now $274
- Lexar 2TB NM1090 w/HeatSink SSD PCIe Gen5x4 NVMe M.2 Was $281.97 Now $214.98
- Apple Watch Series 10 GPS + Cellular 42mm case Smartwatch Was $499.99 Now $379.99
- ASUS ROG Strix G16 (2025) 16" FHD, RTX 5060 gaming laptop Was $1,499.99 Now $1,274.99
- Apple iPad mini (A17 Pro): Apple Intelligence Was $499.99 Now $379.99
*Prices and savings subject to change. Click through to get the current prices.
Manufacturers usually apply thermal paste (built with longevity in mind) during production, meaning you won’t have to think about the application for at least a year after your purchase or until you encounter issues with your product. It may be time to reapply if you notice excessive heat, noise, or a significant decrease in your computer’s performance. And in this guide, we’ll explain the process of applying thermal paste to a CPU or GPU so you can do it yourself at home. We also recommend checking out some of the best thermal pastes, as these offer better longevity.
How to replace thermal paste on a CPU
Here are the steps you need to follow to change the thermal paste on your CPU.
Step
Power down and open the case
Ensure the computer is completely off and disconnected from any power source to prevent electrostatic discharge (ESD) damage. Then, open up the side panel of the case.
Step
Remove the CPU cooler
Locate the existing CPU cooler and carefully unscrew it.
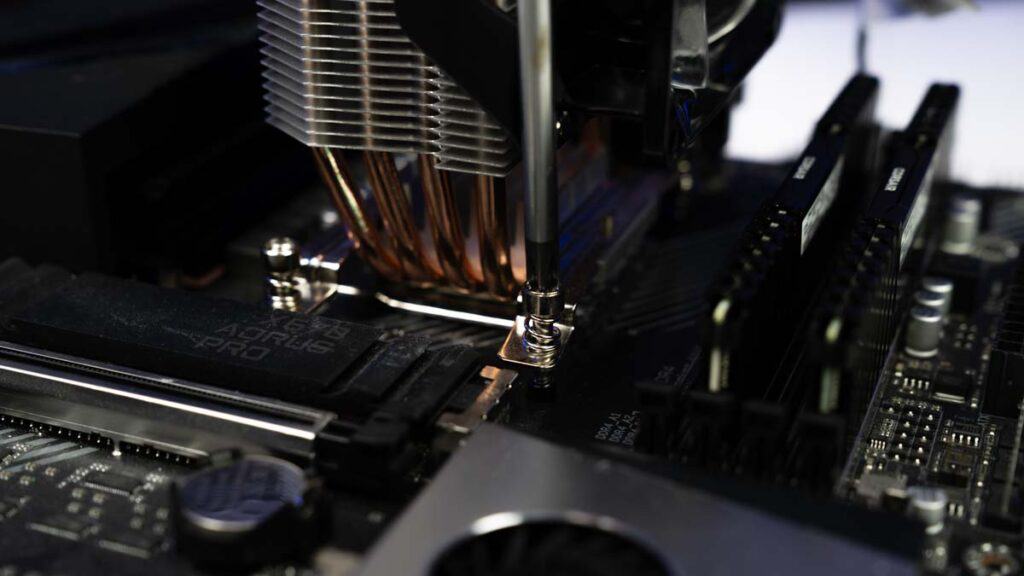
Then, lift it up and place it somewhere safe.
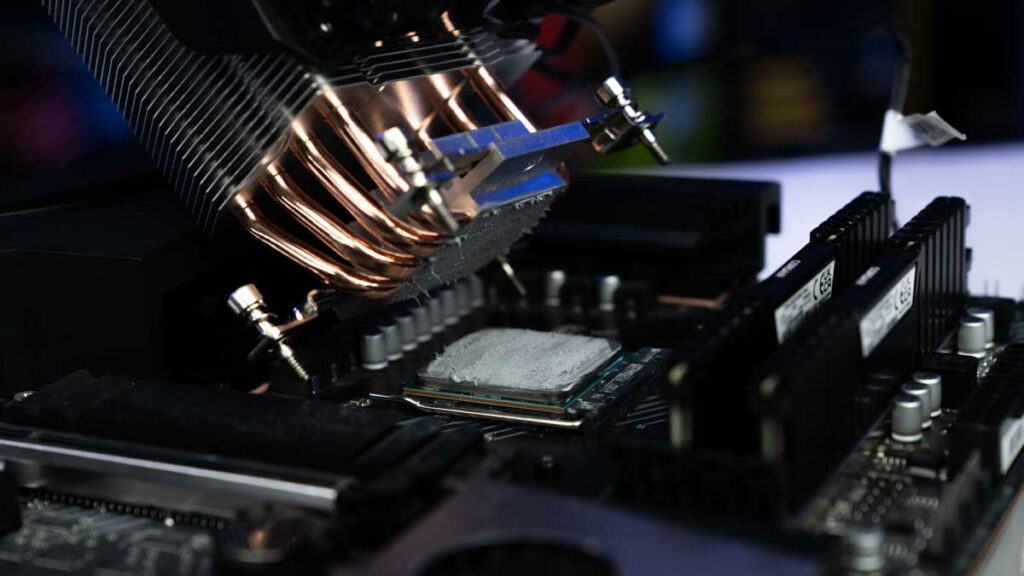
If the cooler is stuck, due to old thermal paste, gently twist it until it becomes loose.
Step
Clean old thermal paste
Once the cooler is removed, you should be able to see the existing paste. This can be removed by applying isopropyl alcohol to a lint-free cloth or paper towel and gently rubbing until all traces are gone.
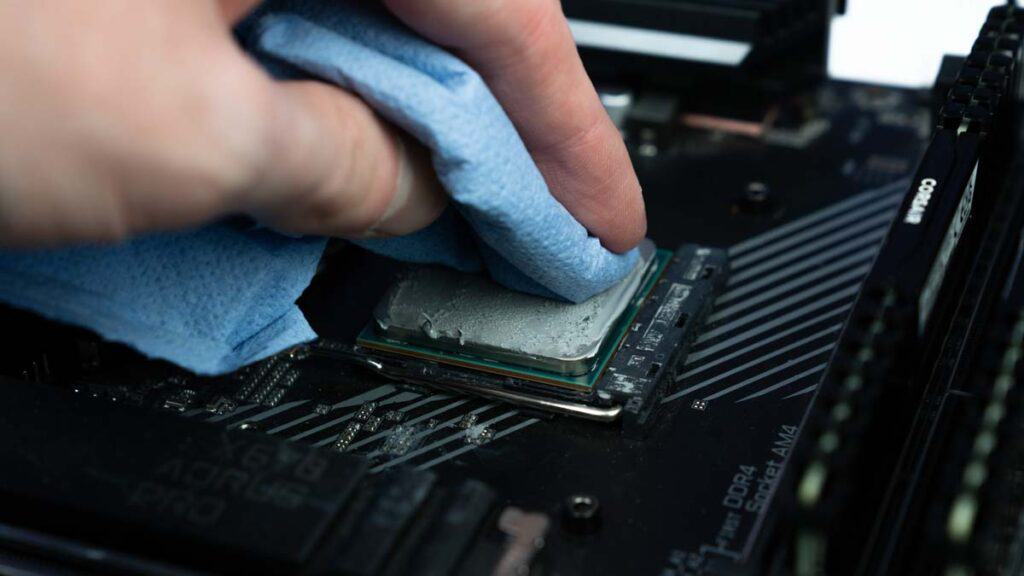
Make sure the entire CPU with no remnants of excess paste. After the CPU is clean, make sure to do the same with the cooler.
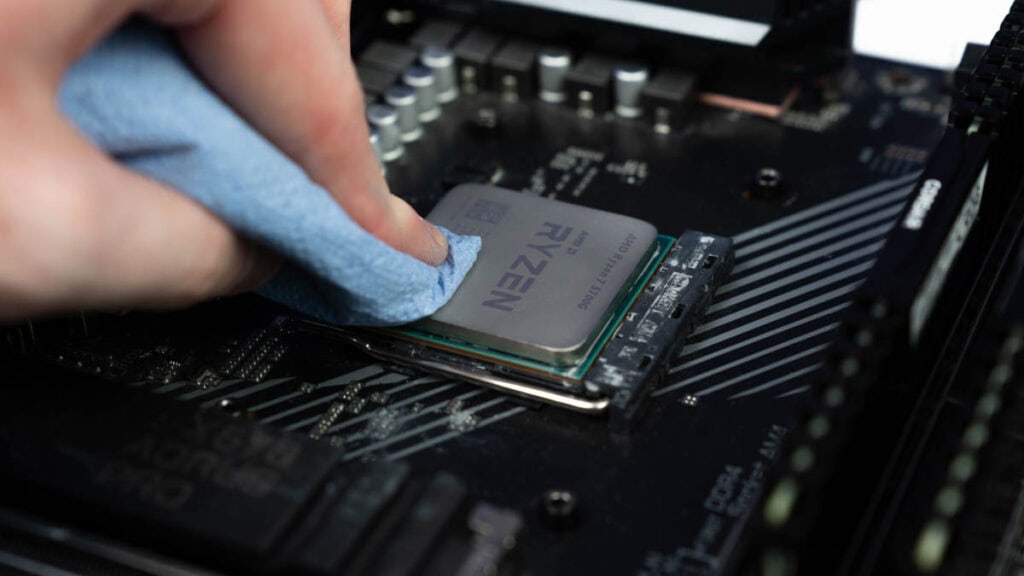
Avoid Contamination: Ensure your hands and tools are clean to prevent contamination of the thermal paste.
Step
Apply new thermal paste
Apply a small amount of new thermal paste onto the center of the CPU (IHS). Don’t apply an amount more than the size of a pea or a small drop, as this will be sufficient. Don’t apply too much paste as this will end up doing more harm than good.
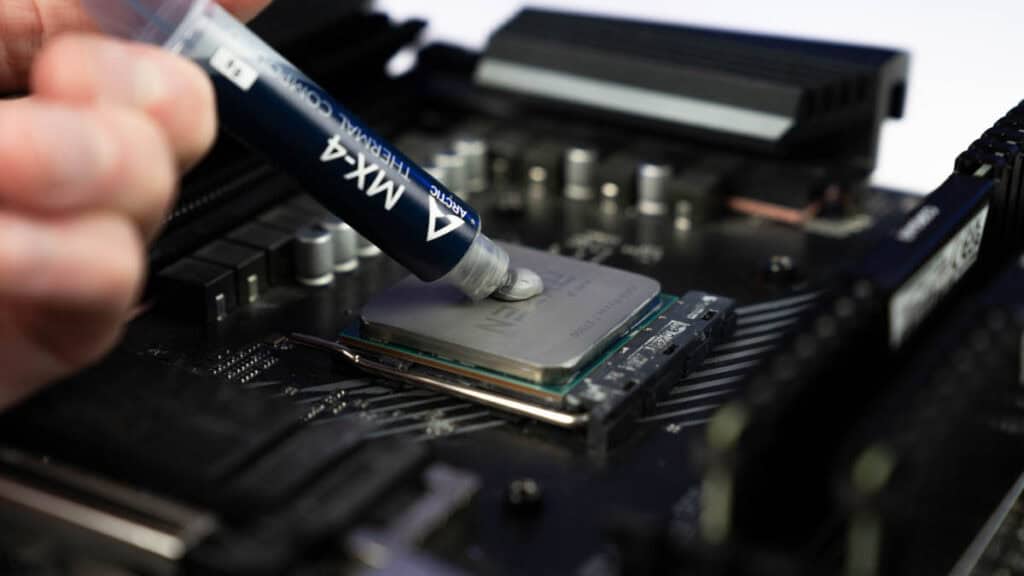
Quality of Paste: Use a high-quality thermal paste for better thermal conductivity.
Amount Matters: Too much thermal paste can cause poor heat transfer; too little may not cover the entire chip.
Step
Spread paste evenly (optional)
Use a plastic spreader or a clean, flat tool to evenly spread the paste across the chip surface. This step is optional as pressure from the cooler typically spreads the paste. Some prefer manual spreading for even coverage, so do as you prefer.
No Metal Tools: Use a plastic spreader or tool to spread the paste, as metal tools can cause damage.
Step
Reattach the cooler
Carefully place the cooler back onto the CPU, ensuring it’s properly aligned. Avoid applying excessive force during the process as it can damage the cooler. After placing it correctly over the CPU, secure it with screws in a diagonal pattern for even pressure distribution.
Step
Connect cooler cables
Reconnect any cables or fans that were disconnected from the cooler.
Step
Close the case and power on
Close the case and reconnect the power. Finally, power on your computer and monitor the CPU temperatures to ensure the thermal paste is effectively conducting heat away from the processor.
Regular maintenance: Replace thermal paste every few years or when temperatures seem abnormally high.
How to replace thermal paste on a GPU
If you want to replace the thermal paste on the graphics card, then follow these steps.
Step
Remove the GPU
After turning your PC off, unplug the power cable from the graphics card. Then, carefully remove the GPU from the motherboard and place it on the table, ideally at a place where it’s safe.
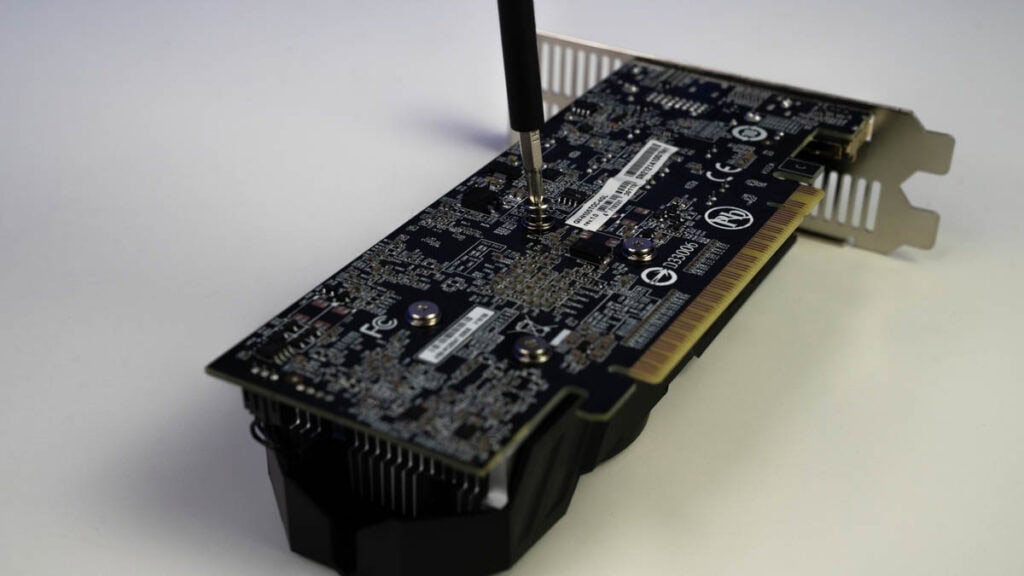
Step
Separate the heatsink and processor
Remove the screws on the back of the GPU using a screwdriver and remove the backplate to separate the heatsink and processor.
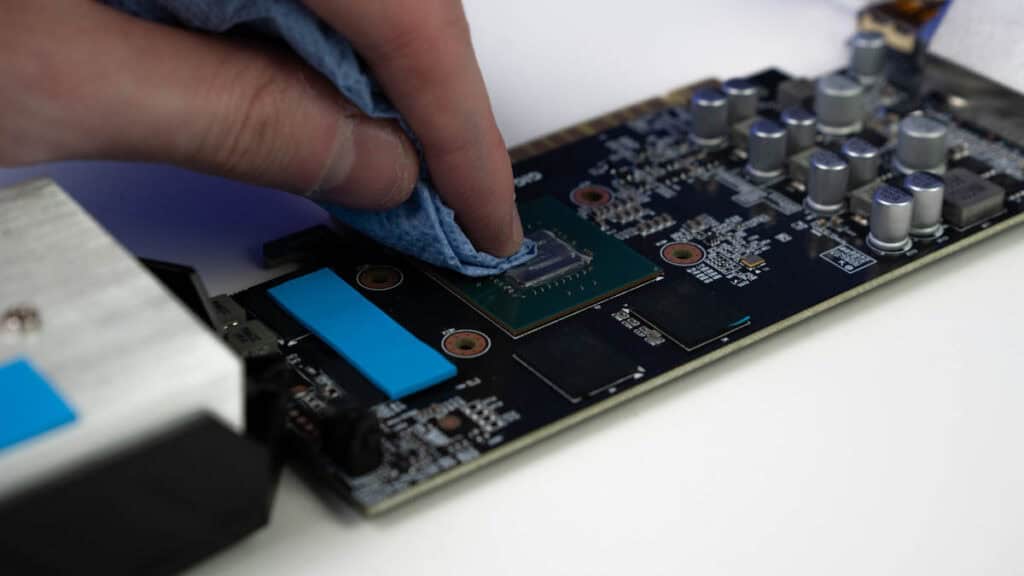
Step
Clean the thermal paste from the heatsink and processor
Use a lint-free cloth or paper towel with isopropyl alcohol on it to remove the old thermal paste from both the GPU processor and heatsink. Keep on cleaning until the thermal paste has been completely removed.
Step
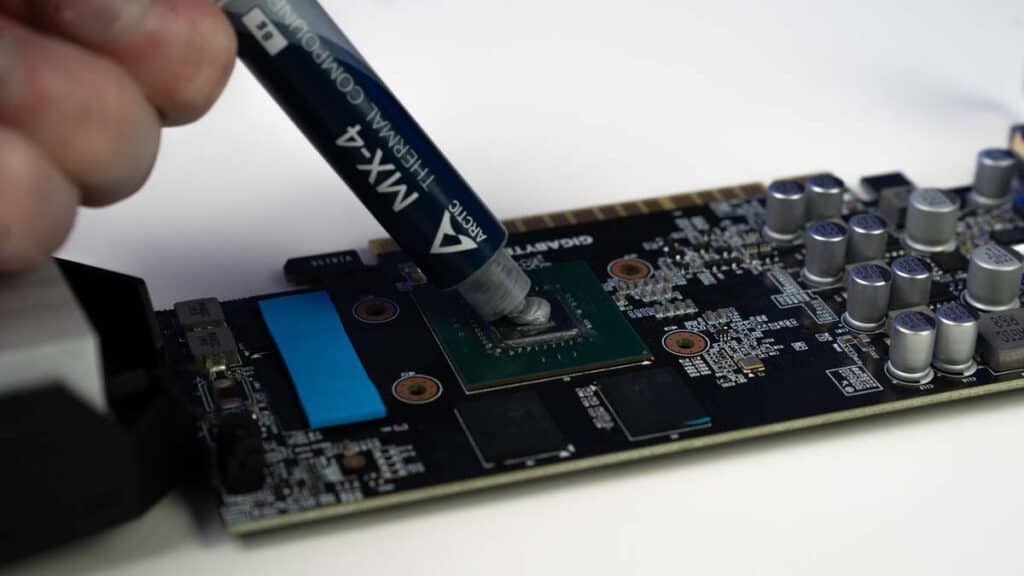
Apply the new thermal paste
Now, apply the new thermal paste, but make sure to put an amount similar to the size of a pea.
Step
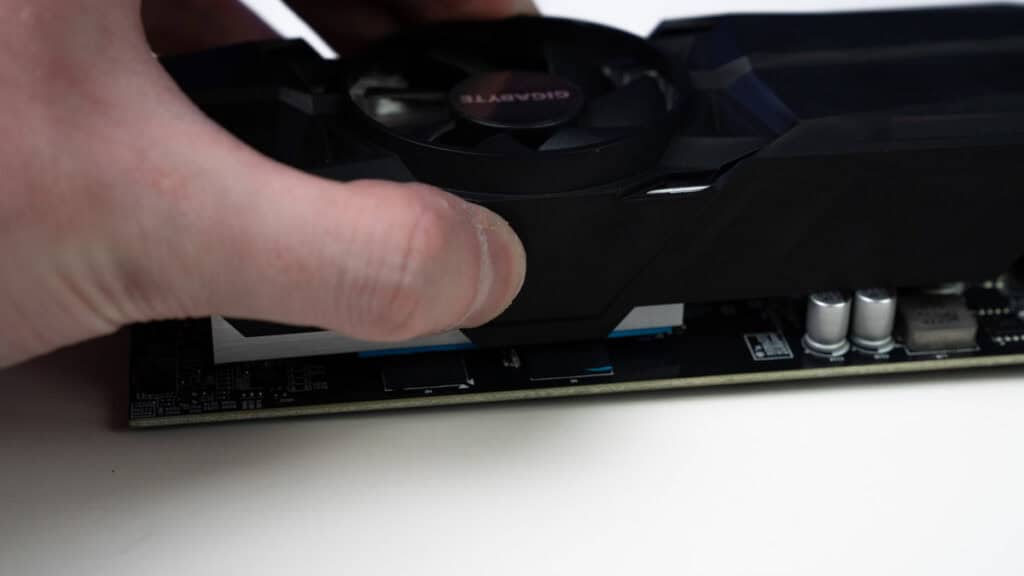
Attach everything back
After the thermal paste has been successfully applied to the GPU, put everything back together, and use the screws to attach the backplate.
Step
Test the GPU
Mount the GPU back on the motherboard and turn on your PC. Then, check your GPU temperature to see if the thermal paste is working properly or not.
Amount of thermal paste
Deciding on how much thermal paste to apply is arguably the most important step of this process; too much or too little won’t be effective in improving heat transfer. So, make sure you take extra care and time at this point in the procedure to ensure you’ve got just the right amount to improve the efficiency of your CPU/GPU.
Can you use the same thermal paste for the CPU and GPU?
Good quality thermal paste is crucial for enhancing heat conductivity between a device and its respective heat sinks, and luckily, the same thermal paste can be used for both CPU and GPU. Although there are various types of thermal pastes, all are designed to serve the fundamental purpose of improving thermal transfer; meaning, you’ll only have to purchase one thermal paste for both your CPU and GPU – an easy way to save money while buying hardware for your PC. Remember to apply a pea-sized amount only.
Is too much thermal paste bad for GPU?
Applying too much thermal paste can be harmful to a GPU. Excessive thermal paste can act as an insulating layer, hindering heat transfer from the GPU to the heat sink. Additionally, it can overflow and potentially cause short circuits if it spills onto other components. Make sure to use a small amount of thermal paste. A thin, even layer covering the GPU’s surface without overflowing is ideal for optimal heat transfer.
Conclusion
So, there you have it! We hope this article has answered all your questions surrounding the application of a thermal paste to a CPU/GPU. Knowing how to complete this task safely is useful if you’re looking for ways to enhance your computer’s performance. We also recommend checking out our top picks for the best CPU coolers if you want to further improve the temperatures.
About the Author