
How to do a mail merge from Excel to Word

Reviewed By: Kevin Pocock

Table of Contents
If you want to learn how to do a mail merge from Excel to Word, we’ve got you covered.
Microsoft Office is a great tool for managing data and sending bulk emails. Things become even better when you use the mail merge tool, which helps you create letters or emails by extracting data from Excel. However, while the mail merge tool is quite intuitive, the options might seem daunting if you're doing this for the first time.
Prime Day is finally here! Find all the biggest tech and PC deals below.
- Sapphire 11348-03-20G Pulse AMD Radeon™ RX 9070 XT Was $779 Now $739
- AMD Ryzen 7 7800X3D 8-Core, 16-Thread Desktop Processor Was $449 Now $341
- ASUS RTX™ 5060 OC Edition Graphics Card Was $379 Now $339
- LG 77-Inch Class OLED evo AI 4K C5 Series Smart TV Was $3,696 Now $2,796
- Intel® Core™ i7-14700K New Gaming Desktop Was $320.99 Now $274
- Lexar 2TB NM1090 w/HeatSink SSD PCIe Gen5x4 NVMe M.2 Was $281.97 Now $214.98
- Apple Watch Series 10 GPS + Cellular 42mm case Smartwatch Was $499.99 Now $379.99
- ASUS ROG Strix G16 (2025) 16" FHD, RTX 5060 gaming laptop Was $1,499.99 Now $1,274.99
- Apple iPad mini (A17 Pro): Apple Intelligence Was $499.99 Now $379.99
*Prices and savings subject to change. Click through to get the current prices.
This is where we come in. In this guide, we will walk you through how to do a mail merge from Excel to Word.
How to mail merge from Excel to Word
Scenario on hand: We have a fictional dataset of customers with their first name, last name, email address, and products ordered.
What we want to accomplish: Explore how to do a mail merge using Excel and Word with a step-by-step guide:
- Step #1: Prepare the spreadsheet
- Step #2: Begin the mail merge from Excel to Word
- Step #3: Connect to your Excel spreadsheet
- Step #4: Choose The recipients of the mail merge
- Step #5: Write your letter
- Step #6: Add your merge fields
- Step #7: Add merge rules
- Step #8: Finish your mail merge
Step 1: Prepare the spreadsheet
Before you begin, you want to ensure that everything in your Excel spreadsheet is prepared for the mail merge.
All the data required for the merge should be provided on the first sheet of your Excel spreadsheet.
Here is a snapshot of our sample dataset:

Some other points to check when you're preparing your spreadsheet:
- The spreadsheet must be formatted with one row for each intended recipient.
- The first row of the spreadsheet should have the column labels.
- Make sure no field name is missing.
- Check that the column names in the spreadsheet and the field names you wish to insert match.
- Ensure that data entries in the spreadsheet are correctly formatted so their values can be read appropriately.
- Save the Excel spreadsheet to your local device if it isn't already saved.
Step 2: Begin the mail merge from Excel to Word
With your information prepared and checked, you can begin the mail merge. The process is suitable for both mail and email messages.
Once your data is checked, open a Word document.
Next, select the Mailings tab and “Start Mail Merge.” A drop-down menu will appear. Select the type of mail merge you wish to run, such as Letters or E-mail Messages.
For our demonstration, we are choosing “E-mail Messages.”

Step 3: Connect to your Excel spreadsheet
On the Mailings tab, click on “Select Recipients”. From the drop-down menu, select “Use an Existing List”.

A dialog box will appear, allowing you to connect your Excel spreadsheet to your Word document. Find your chosen Excel file and select “Open,” then find your chosen target sheet and select “OK.”
Make sure the checkbox on the bottom is ticked:

Step 4: Choose the recipients of the mail merge
On the Mailings tab, click Edit Recipients List. This will allow you to refine the recipient’s list and remove anyone not in the intended audience.
The Mail Merge Recipients dialog box also allows you to sort, filter, and validate the recipient's email using the Refine recipient list option in the same dialog box.

Step 5: Write your letter
Create your letter in your Word document, or copy a pre-written message from another document.
Here's the message we created:
Note that we added the field names in square brackets, but these still need to be linked to the mailing list.
We will add the merge fields in the next step.
Step 6: Add your merge fields
In the Mailings tab, select Greeting Line. A dialog box will appear. Select the settings and options that work for you using the Preview section to check the data is correct.
We only want to address the customer by their first name, so we select the option that gives us that and check the preview:

Note: Since we are drafting an email, there's no need to add the Address Block. However, if you wish to draft a letter for mail, modify the Address Block settings in a similar fashion.
The Greeting Line will appear as a placeholder. You can erase the greeting line from your message:

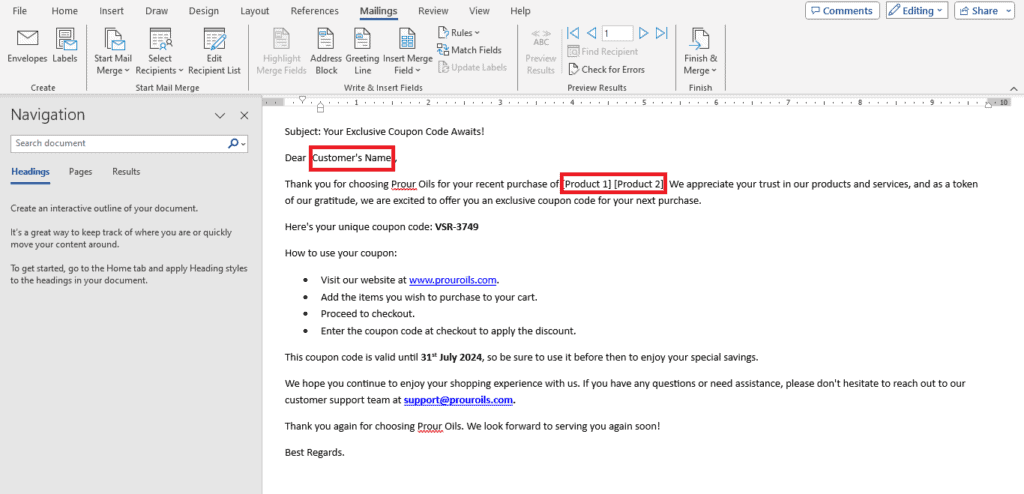
Other merge fields can be added using the Insert Merge Field drop-down menu. Insert your chosen field within the text.
Select “Highlight Merge Fields” for a better view.
Here is what our draft looks like:

Step 7: Add merge rules
Note that we have two merge fields, “Product 1” and “Product 2”. Some customers ordered one product, while some ordered two products.
If we leave this as it is, it will appear like this: Chamomile oilTee tree oil.
We want to add an “and” between Product_1 and Product_2, but only if Product_2 is not blank.
For this, we place the text cursor between the Product_1 and Product_2 placeholders and head to “If…then…else” under the “Rules” option, which opens up a dialog box.
Note: Make sure there is no space between the two placeholders, as we will add space in the rules.

We select Product_2 as the field name and select “is not blank” as “Comparison.”
In “Insert this text,” we add “and” with one space at the beginning and one space at the end, then click “OK.”

Step 8: Finish your mail merge
To preview your email, select “Preview Results” on the Mailing tab. Use the arrow keys to navigate across the recipients.
Note here that we have just one product listed for Recipient 1 and 2 products separated by “and” for Recipient 3 because of our “If…then…else” rule.


To finish, select the Finish & Merge button on the Mailings tab. From here, you can print or email the letter. Alternatively, you can edit individual documents using the same button.

Save your mail merge document by clicking the Save button.
The mail merge Word document will now stay connected to the Excel data source. Next time you have a bulk message to send out, you can use the same document.
Wrapping up
A mail merge from Excel can help you to place data into form letters accurately. By using this method, you can send personalized mail with greater ease. Ensure the information and headings in the Excel form are correct before merging, or you will encounter errors. However, the preview button can ensure everything is accurate and the data has been merged correctly.
Learn more about Excel through these helpful guides:
About the Author