How to enable TPM 2.0 in BIOS for Windows 11

Reviewed By: Kevin Pocock

Table of Contents
Windows 11 hasn't got off to the best of starts months before it’s even due to come out. Many people downloading Microsoft's PC Health Check app that appeared on the new Windows page after the announcement of the new version of the operating system were greeted with a stone wall of “The PC can't run Windows 10” error message. This is mostly due to TPM 2.0 not being enabled in the BIOS.
This was concerning to those who had decent PCs that are well in spec. Here at PC guide included! Our best machines were met with a “Jog on sonny, this operating system is not for your type.”
Particularly well done!
It seems though your lack of two-week-old hardware isn't the issue though and it is your pesky BIOS that is causing the issue.
Enable TPM 2.0 and Secure Boot to pass PC Health Check
In order for PC Health Check, and indeed Windows 11 to pass its initial checks you need to have Secure Boot enabled in the mobo BIOS and also have a TPM 2.0 chip (Trusted Platform Module), which quite possibly is something you have never even heard of, let along know if you have one.
The TPM 2.0 chip is listed in Windows 11's system requirements but the Secure Boot section merely says Windows 11 is Secure Boot capable and makes no mention of you needing to having it switched on in BIOS. Thanks Microsoft.
On top of that some – and at this point, nobody is sure how many, consumer motherboards come minus the TPM chip which needs to be added on as an extra – something that not everyone is going to be comfortable with.
Whether this turns into a big story or not we will have to wait and see, but for the moment we will put it in the one to watch pile.
For now, you can follow our simple steps below or watch Sarah take you through the process in our handy video guide.
How to check your TPM 2.0 chip is enabled
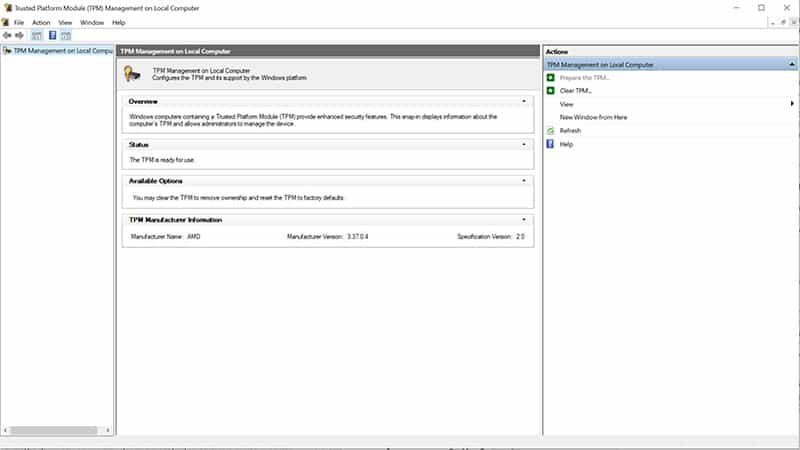
If you want to check whether your TPM 2.0 chip is enabled, press the Windows key + R to open up the run box and type tpm.msc.
You will then get an alert saying whether it is or not in a box similar to the above. If it's not you need to check in the BIOS whether that is disabled as well (see below). And if you can't find it, then start searching as to whether your mobo even has one.
Changing the above in the BIOS made this error go away for me however and I was then able to launch the PC Health Kit App and pass the necessary test and receive the news that my PC was in fact suitable for Windows 11.
Select Secure Boot from the options
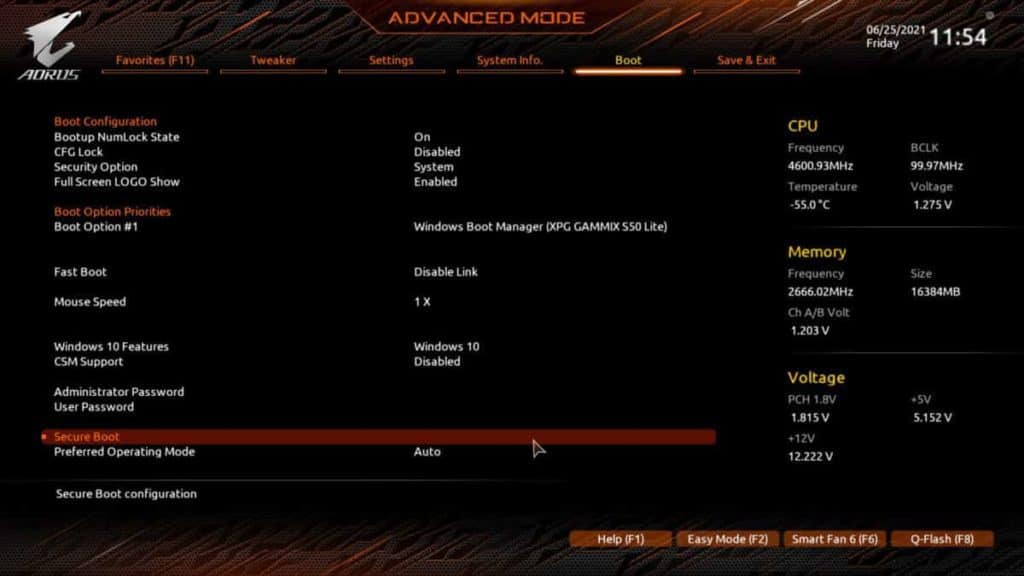
Navigate and select the Secure Boot tab.
Enable Secure Boot
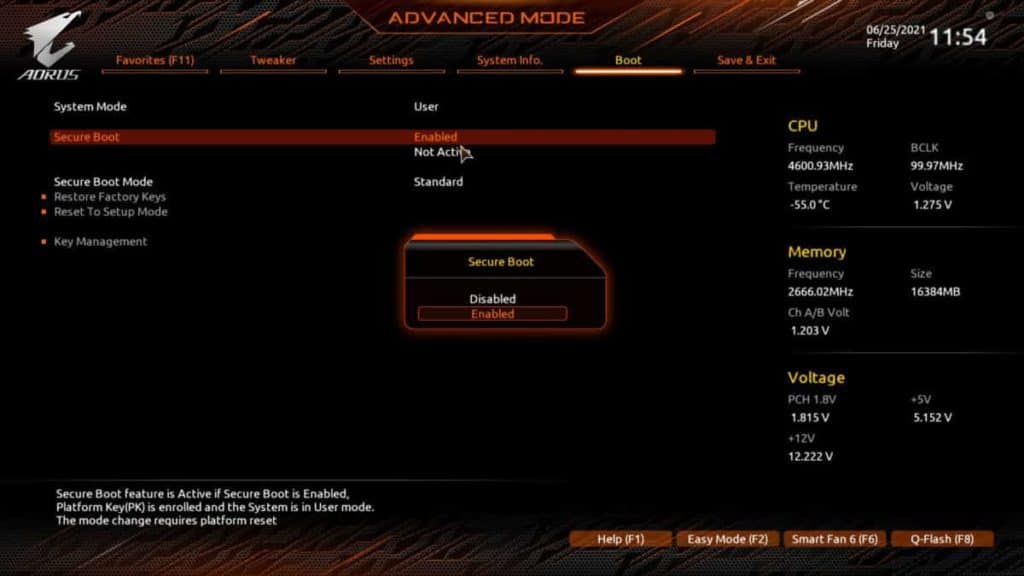
Now click Secure Boot and change it from Disabled to Enabled. Now hit F10 or select Save & Exit and restart the PC.
You should now be able to pass the PC Health Check without it complaining.
Conclusion
So as you can see it is pretty simple to sort out getting your PC ready (currently) by enabled TPM 2.0 and Secure Boot. We would predict that you won’t have to do to any of this when it comes around to the actual Windows 11 launch or it would be a customer service nightmare for Microsoft.
But for now, it certainly doesn’t do any harm to enable the options in readiness.
How to enable TPM 2.0 in BIOS
In the meantime, if you want to check the status of your current rig you are going to need to head into the BIOS. Don’t be scared here. While all BIOSs are built differently, they generally have features in similar places.
it is worth noting that both AMD and Intel have different terminology for what we will be looking for here.
Intel = PTT
AMD = FTPM
To all intents as purposes the technology and method to actually update them should be similar.
Enter the BIOS

Even if you are a regular in your system’s BIOS it can still be a bit trial and error to actually get into it as it all around timing a keypress. Reboot your system. If you aren’t sure of the key to press to access the BIOS it will generally flash up on the screen for a few seconds. As a rule, it will be the DEL or F2 key.
The key is to hammer the key a few times as this screen appears and if successful you will find yourself in your PC’s BIOS screen.
Switch Your BIOS into ADVANCED mode
Most BIOS’ initially boot into an EASY mode as this is the area where it is less likely to cause any serious issues. However, for our purpose here we will need ADVANCED Mode. Have a look around for anything obvious to click that will switch the mode. You can also try clicking F2.
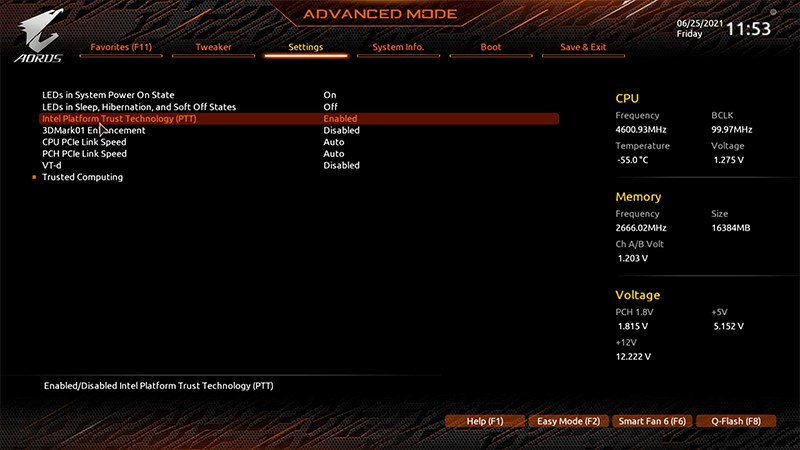
Inside MISCELLANEOUS option, enable TPM 2.0
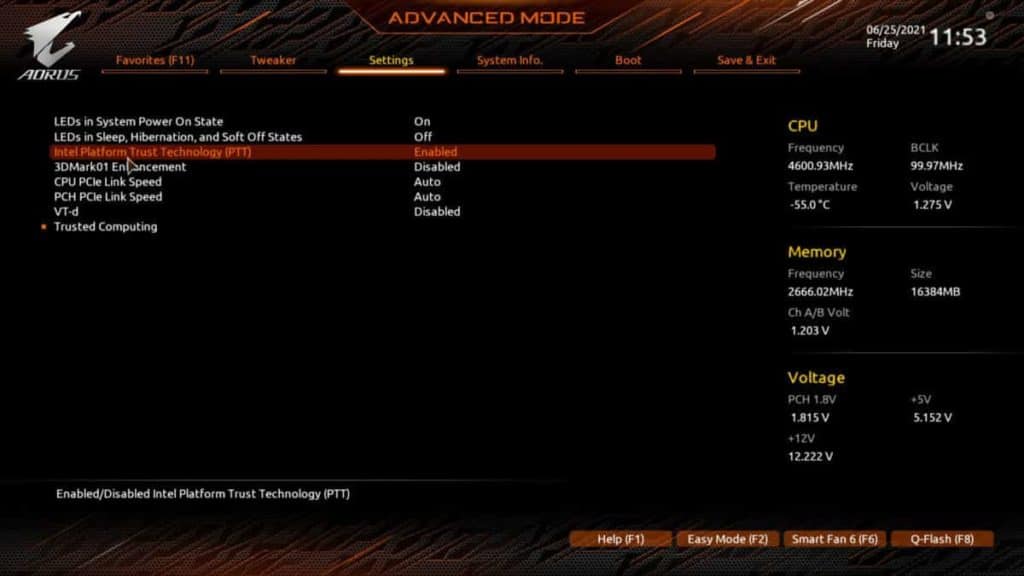
As we are using an Intel board here we are looking for the PTT option (Intel Platform Trust Technology. This is Intel’s TPM. As mentioned above, AMD calls it something different.
You will probably see it isn’t enabled. Simply click on it to enable it from the option that drops down.
Now SAVE & EXIT the bios and reboot (you can also hit F10).
Enable Secure Boot
As well as enabling TPM 2.0 you will need to make sure Secure Boot is enabled too. Without this, you won’t be able to complete the install of Windows 11.
Enter the Bios
If you have rebooted you will need to start again and enter the BIOS using the same method as above – generally F2 or DELETE.
Select Advanced Mode
As above we need to dispense with Easy Mode. We are heading into full-on Advanced mode once more. Buckle up.
Have a look around for anything obvious to click that will switch the mode once more. You can also try clicking F2.
Select Boot Options in Bios
It’s worth noting here that we found this option on an AMD motherboard under Security, not Boot Options but on our Intel board it is where you would probably expect it to be.
So head there.
About the Author