How to factory reset Windows 11

Reviewed By: Kevin Pocock
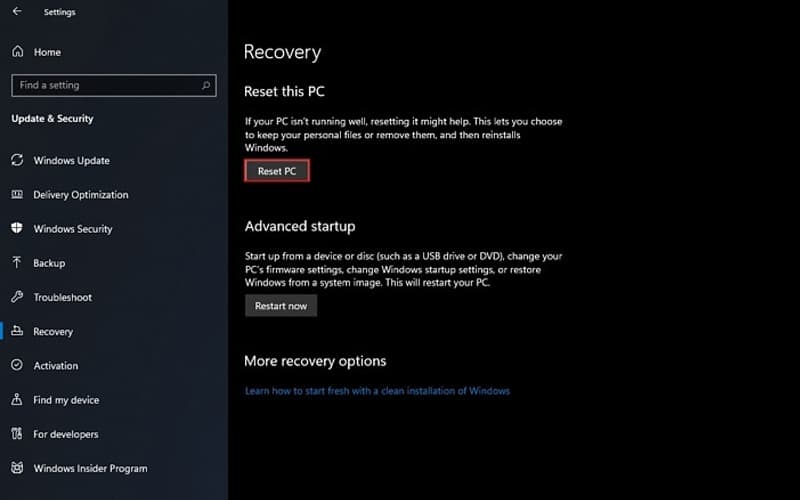
Table of Contents
Due to Windows 11 being a brand new operating system from Microsoft, problems could arise with your install, causing you to be stuck on various screens or even problems booting up. Additionally, there could also be vulnerabilities in the software and malware or viruses could easily infect your new Windows 11 machine and cause even more havoc than you thought was possible.
Luckily, there’s a way to start from scratch with Windows 11 so that you can have a fresh install and remove any problems you might currently be facing.
In this article, we’ll be taking you through different ways in which you can factory reset Windows 11, so you too can enjoy that brand-new OS experience with no hiccups.
How to factory reset Windows 11
Windows 11 offers three options for resetting your computer, to various degrees depending on how comprehensive you want to be. Here's a breakdown of the options provided by Windows 11.
Refresh Your PC
This is the least invasive option officially supported by Windows for repairing any major issues with your Windows installation. This will leave any files stored on your computer intact, but it will uninstall any software that you have installed, except for those you've installed from the Windows App Store.
If you're having a few minor problems with your Windows install, and just want to undo some changes that might have been made to core operating system files, this may be a good option. It's relatively noninvasive and lets you keep any saved files on your computer. You will have to reinstall a lot of software, so it's recommended that prior to conducting a refresh, you backup any important files associated with the software you have installed, like game save files or configuration files.
Step
Open Windows Security
To access the option to refresh your Windows 11 installation, open “Windows Security”, which you can access from the Start menu.
Step
Go to the “Device performance & health” tab
Select “Additional info” from the “Fresh Start” section.
From there, you'll be taken to the “Fresh Start” screen, which will give you some details about the process, and give you the option to “Get started”.
Step
Choosing Get Started
Once you have backup up any important files associated with software that will be uninstalled during this process, you should be ready to select “Get started”.
Windows will then guide you through the step-by-step process to complete a refresh. Windows says that this process will take 20 minutes in total, but it will depend on your hardware configuration and other factors.
Upon completion, you'll have a Windows install that has been cleaned of harmful elements or misconfigured settings.
This is not a total system wipe. While it will reliably get rid of the vast majority of malware, due to some files remaining untouched during this process, there are other options that offer a more comprehensive solution for wiping your computer clean for a new start.
Reset This PC
This is similar to the option to refresh your PC, but with the option of removing all files stored on your system. This is a more comprehensive system wipe, that will restore your Windows install to the default state it was in when the initial installation was first completed.
If you're going to go for this option, you will need to fully back up the contents of your PC, perhaps on a USB drive. Any files, documents, images, videos, or anything else stored on your computer will be completely wiped during this process. This is great for ensuring that you are provided with a comprehensive cleaning, as everything on your computer will be wiped.
Step
Go to “Reset This PC”
Once you've backed up files that you want to keep, you can perform a system reset by going to the “Reset This PC” menu from the Start menu, and select “Get started” from under the “Reset this PC” heading.
Step
Choosing Options
Then you'll be presented with the choice to Reset your PC whilst keeping your files, or to reset without keeping your files.
Without keeping your files is the more comprehensive option.
Since it will remove any potentially harmful files that may have found their way onto your computer, and if you have many junk files that you no longer need taking up hard drive space.
It will clear them out, but keeping your files can also be convenient. If you're concerned about a serious malware infestation, removing all files might be the smart choice, but otherwise, it's just a question of which you prefer to do.
System Restore
Step
Go to the Recovery control panel
Rather than simply starting from scratch, you can use the Windows System Restore function to restore your operating system to a previously backed up status. You can simply select a previously created Restore Point from a time when your computer was working without issues, and revert to that restore point.
Any software that has been installed since the restore point will be removed in the process, along with any new drivers or operating system updates. You will not lose any files that are saved on your computer since this just affects the core operating system and software installs.
To perform a system restore, go to the Recovery control panel, which you can find via the start menu. This will then present you with options to Open System Restore, which will let you revert your computer to a previously saved restore point. You can also manually create a restore point from this menu via the “Configure System Restore” option.
Your computer will reboot during the system restore process. Once it boots back up again, you will be reverted to the previously saved restore point, undoing any changes made to your operating system since the restore point was made.
This is great for undoing changes that have been made to your computer by software installation and can undo bugs and quirks introduced by anything modifying your core operating system configuration, and it conveniently restores settings and configurations.
Restore points are by default automatically created when you install new software, but it's also smart to create manual restore points from time to time.
Complete Fresh Install
This is the last resort, where instead of using one of the tools provided by Microsoft to attempt to restore your operating system to a previous state, you're completely wiping everything and start again from scratch.
It's a somewhat severe undertaking if you're just hoping to address some minor issues, but if you want to be absolutely certain that you're clearing out any old junk files. Undoing any misconfigured settings or configuration, and entirely removing any malware that has found its way onto your system, it's worth considering a fresh Windows install from time to time.
Before embarking on a full system wipe, we recommend backing up any important files and documents externally. You could use cloud storage for this purpose.
We also recommend linking your Windows product key to your Microsoft account.
It will streamline the installation process in the future.
- By letting you simply log in to your Microsoft account, and Windows will pull your product key from there.
- To ensure you have the correct license for the version of Windows you are wishing to install.
- You can link your product key to your Microsoft account from the “Activation” menu, which you can find from the Start Menu.
Once you've done these, Microsoft provides a tool for creating Windows installation media here, and you could either use a USB drive or a DVD, whichever you prefer.
Completing a fresh Windows install from external media will completely wipe all files on your selected hard drive. It will give you a completely clean slate to start from.
It's perhaps the most severe option available and will be the most time-consuming, but once it's done, you can be confident that any issues caused by your previous Windows installation having something go wrong will be entirely resolved.
These are the best ways to deal with issues at the heart of your Windows 11 operating system and should help greatly with any problems you may have with Windows 11 not behaving properly. Please let us know in the comments how you get on with these different options.
About the Author