Last Updated on
If you want to know how to enable Macros in Excel, you’ve landed on the right page.
When working in spreadsheets like Excel, there are a few tricks that can really speed up your data management. One of these tricks is using Macros. A Macro is an automated action that you can create within Excel. Put simply, a Macro can enable you to complete what are often time-consuming tasks within seconds.
For example, if you use Excel to monitor accounting, you could create a Macro that could tell you who is overdue rather than going through it manually. Now, whenever you need to know this information, you have a simple button to complete the task in seconds.
In this guide, we explain how to enable Macros in Excel, so you save time when dealing with large data sets.
How you can enable Macros in Excel
Scenario on hand: We have a dataset of marks some students secured in tests and midterms in an Excel file.
What we want to accomplish: Explore how to enable and use Macros in Excel by learning:
- How to enable Macros
- How to set up Macros
- How to record Macros
- How to save a Macros file
How to enable Macros
As macros deal with coding, there is potential that they can contain malicious code if you aren’t careful. To avoid malware attacking your computer, you must ensure you trust where the files are coming from.
For this reason, Macros are often disabled per default settings, so you have to enable Macros within Excel settings if they aren’t already active. Here’s how.
Option 1: Open a file with a Macro
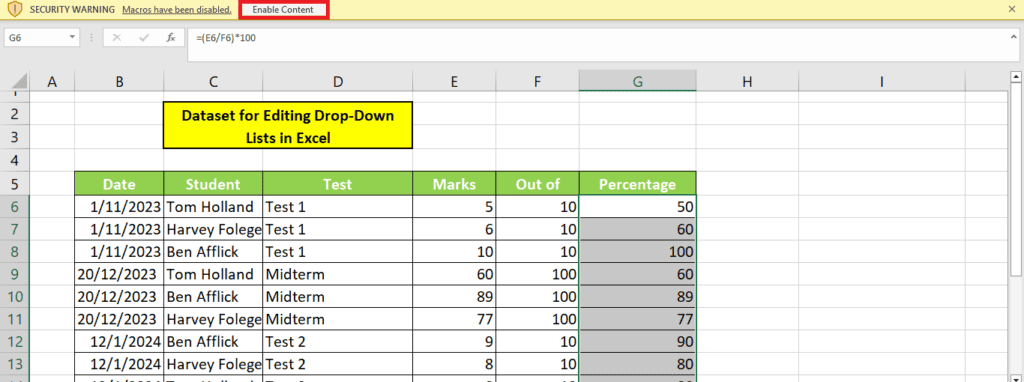
Suppose you simply attempt to open a file with macros within Excel and haven’t already enabled macros. In that case, you will receive a security notice from Microsoft asking you whether you want to enable macros or not.
This is simply a security wall to double-check that the macro comes from a trustworthy source and is a helpful reminder.
You can activate Macros by simply clicking the ‘Enable Content’ button.
Option 2: Enable Macros from the Trust Center
Another way to enable macros is in the Microsoft Office Backstage view.
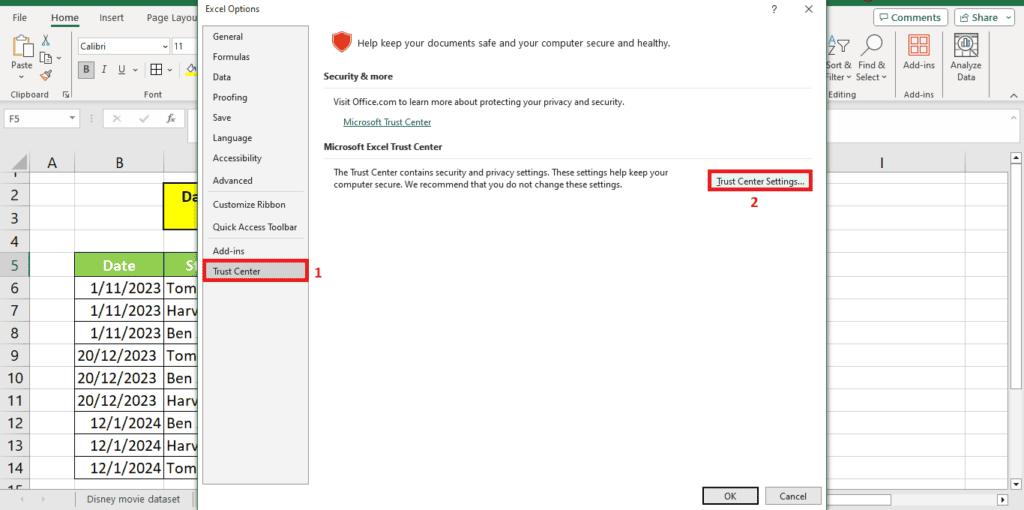
Click the ‘File’ tab, and then click ‘More’ and then ‘Options’ from the left-hand side menu.

Upon clicking this button, Excel will open a window. Head to the ‘Trust Center’ and click ‘Trust Center Settings…’.
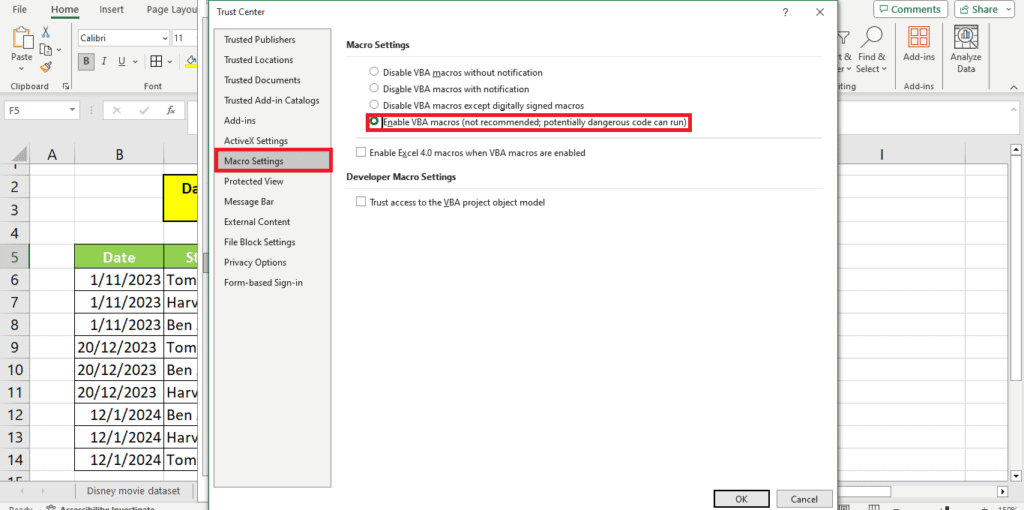
Here, you will see an option named ‘Macro Settings.’ From here, enable Macros. This will again show that it is not recommended since it can cause potentially dangerous code to run.
How to set up Macros
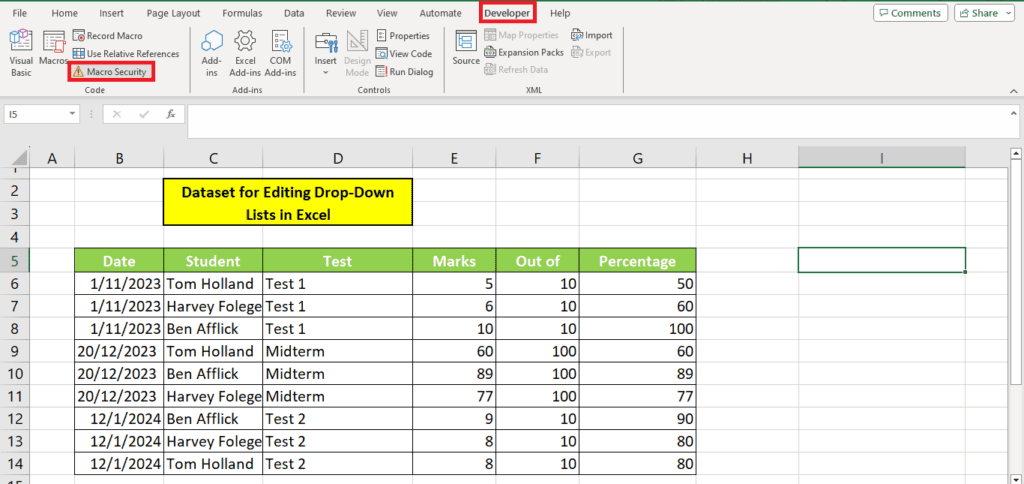
The macro settings are available in the ‘Developer’ tab. Sometimes, the Developer tab is hidden in Excel’s default setting, so you may need to enable it in your settings.
Step 1: Enabling the Developer tab
Simply go to the ‘File’ tab, and then click ‘More’ and then ‘Options’ from the left-hand side menu.

Head to ‘Customize Ribbon’ on the window that opens up and enable the ‘Developer’ tab:
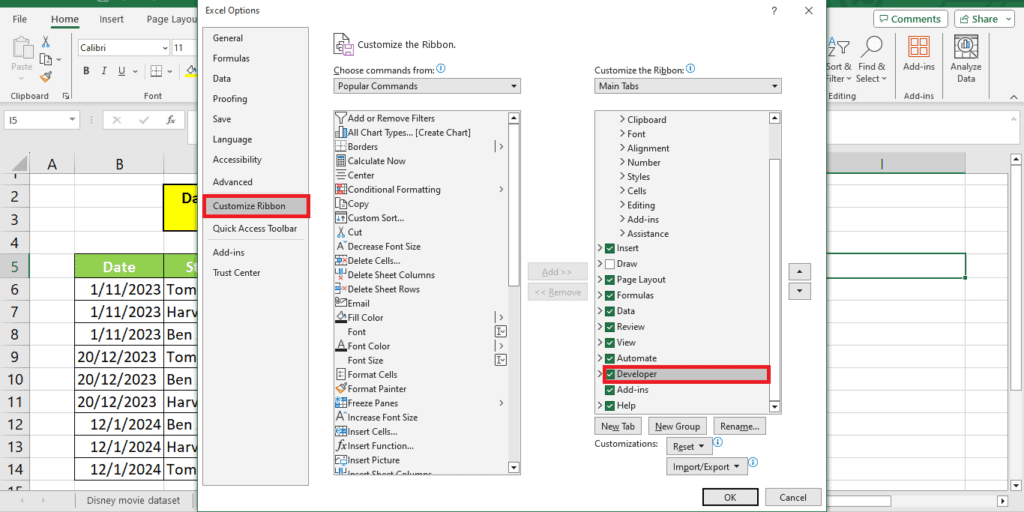
Once the Developer tab is activated, you can handle all Macros settings from here, including enabling Macros for any document:
Step 2: Opening the VBA workstation
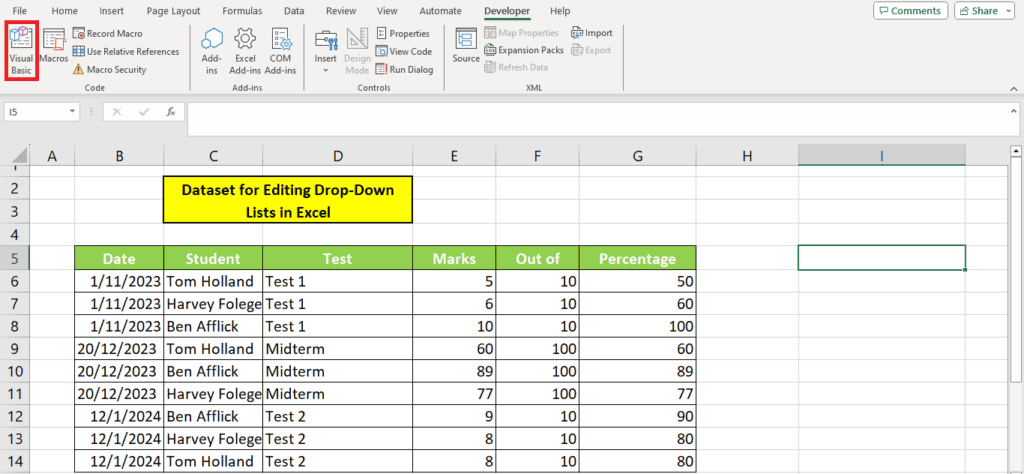
Here, you will also find the Visual Basic Advanced workstation. VBA has its own coding language that is generally easy to learn. Alternatively, many guides also have VBA codes that you can copy-paste onto your document to enable advanced functions.
How to record Macros
Recording macros allows everyone to create and use macros without having experience with coding.
This function simply records the actions you have completed and creates the code to replicate that as you wish, rather than doing it manually yourself.
To record a macro, here are the steps to follow:
Step 1: Record Macro
Under the ‘View’ tab, click ‘Macros’ and ‘Record Macro’.
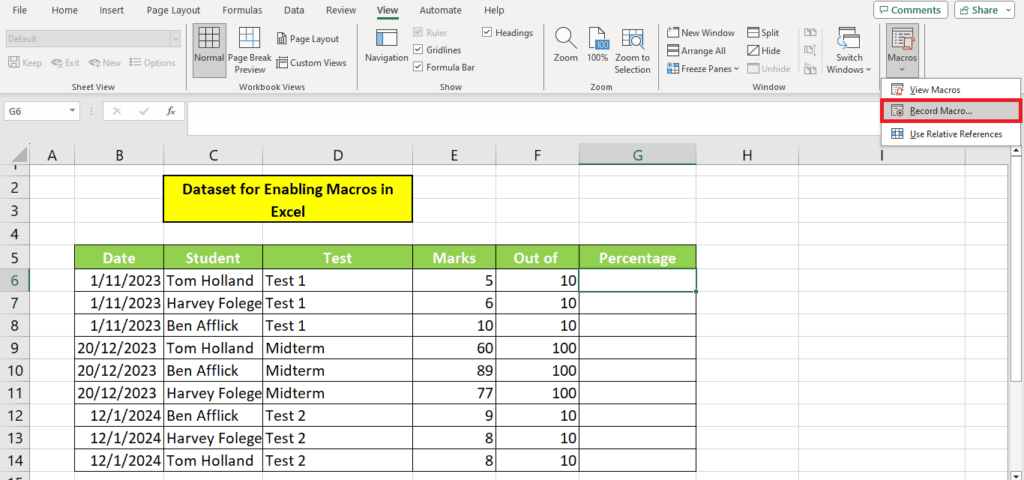
This will open a window for you to describe the Macro and designate a shortcut key:
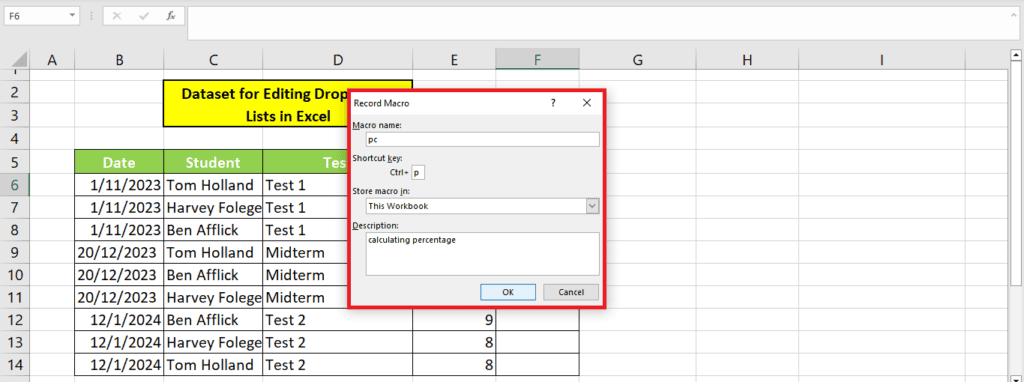
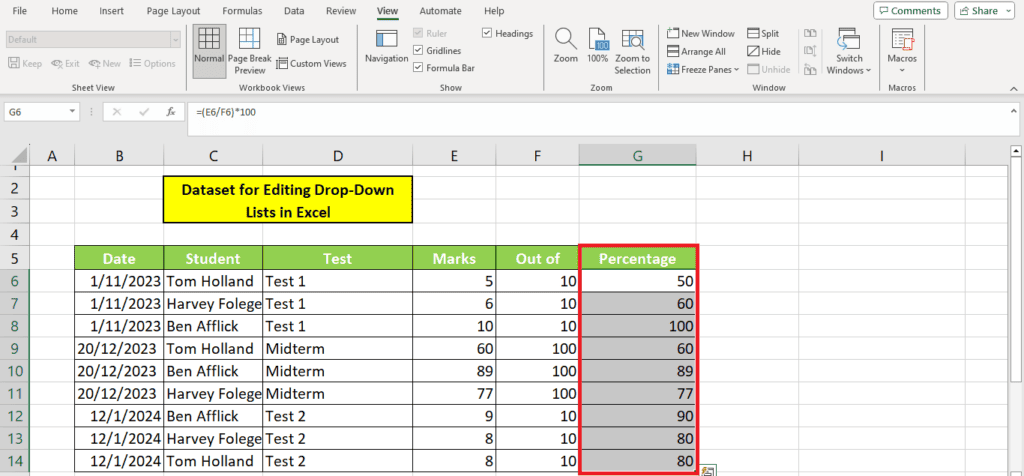
In our demonstration, we assigned the shortcut Ctrl+p to a simple percentage formula.
Step 2: Complete actions
Once you have hit the record button, it is time to record your actions. Ensure you only record the actions you want to replicate using the designated shortcut key.
For our demonstration, we had the table ready with the marks secured, the total marks, and the empty percentage column.
We simply recorded the percentage formula in the Macros:
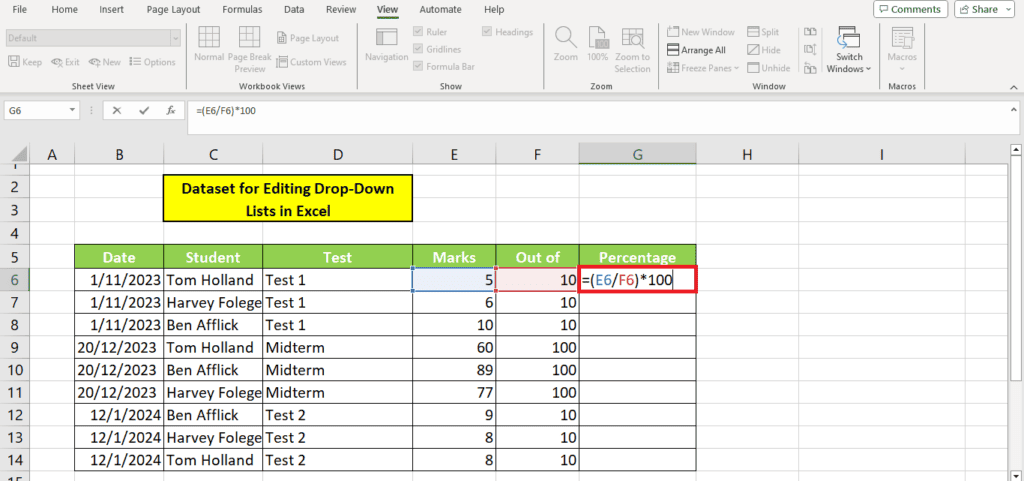
Step 3: Stop recording
Once you have completed the actions you want to designate to the shortcut key, stop recording:
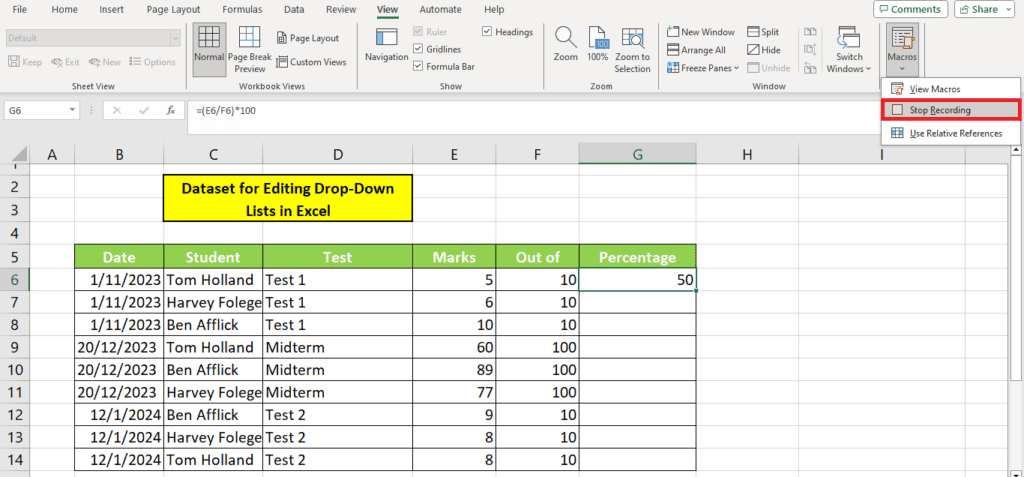
Now that we have stopped recording, we can simply press Ctrl+p (the designated shortcut key) to input the formula for the other rows. Here’s what we get:
How to save a Macros file
If you’ve added a VBA code in Macros or recorded an action, you need to save the file in a specific way to continue using the shortcuts and code the next time you open your file.
Click “Save as” from the File tab.
Excel will automatically show you this message:
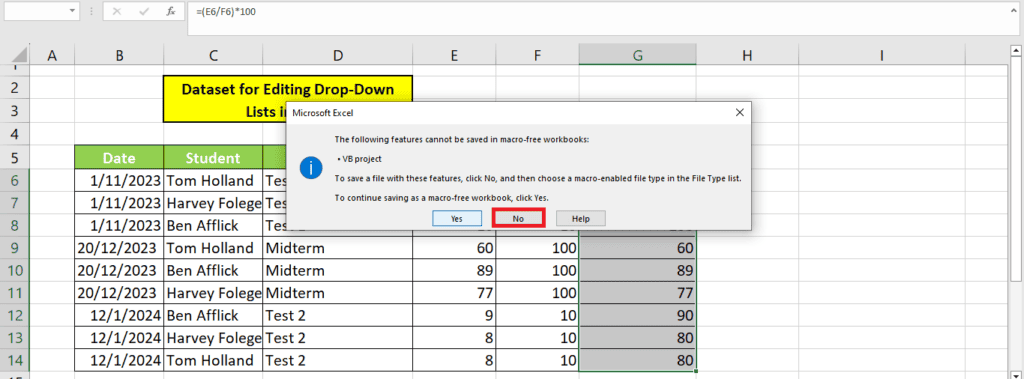
If you click ‘Yes,’ you won’t be able to use your Macros shortcut the next time you open the file. If you click ‘No,’ you will have to save the file as a Macro-Enabled Workbook:

Wrapping up
This was how to enable Macros in Excel. Macros, once mastered, are a seriously helpful and practical feature that will make your data management much more efficient. Macros sound a little complex and even potentially dangerous, but we recommend playing around with them as you will undoubtedly get a lot of use out of the macros if they work.

