How to add music in Wallpaper Engine


Table of Contents
To add more life to your dynamic desktop background, why not add an audio file to upgrade it to the next level? In this article, we will show you how to add music in Wallpaper Engine for both community wallpapers and your own wallpapers.
Wallpaper Engine is an application software that was initially released on Steam back in 2016. As years have passed, it has now become one of their most-used apps. The software allows Windows and Android users, to download and create live desktop backgrounds much like Window’s DreamScene.
Wallpaper Engine has a feature that now means you can add music to accompany your background – creating a mesmerizing experience. The process of doing so is relatively simple. Keep on reading to see how it is done.
Add music to your own wallpaper
Adding music to your moving desktop background will undoubtedly upgrade the vibe of your PC. Imagine having your favorite songs or relaxing ambience sounds to accompany your wallpaper visuals.
To add an audio file to a desktop background you have created is very simple. For those who are hoping to add it to a community wallpaper, we have outlined this method further below.
To start things off, open Wallpaper Engine on your computer.
Step
Edit Wallpaper
With Wallpaper Engine open, head to the “Installed” tab and locate the wallpaper you would like to add music to. Click on it and then select the blue button “Open in Editor”.
Step
Add asset
To add music, simply press “+ Add Asset” in the top-left. Next, scroll down to click on “Sound” then “OK”. This will bring up a file explorer window on your PC. Here you will want to find your audio file, select it then click “Open”.
Step
Save your wallpaper
Once your audio file has been uploaded, head to “File” in the top-left and select “Save”. With this done, exit out of the editor by clicking the red close button on the top-right.
Simply set your new wallpaper by selecting it from your “Installed” window and click “OK”. Your new wallpaper will now appear on your desktop with the sound playing too.
Add music to a community wallpaper
Adding music to a community wallpaper is a bit more difficult. Bare in mind, to re-publish or edit someone else’s work on Wallpaper Engine, you will require the rights from the owner. If in doubt, simply contact the owner to ask for permission.
To do this method, you require the Unofficial Community Scene Unpacker, created by Wallpaper Engine’s community members. This tool allows you to access the original wallpaper files, to use as a starting point for your own wallpaper. Let’s see how to do so below.
Step
Duplicate the wallpaper files
We need to duplicate the original files to be able to edit the wallpaper and add audio to the background. To start things off, head to the “Installed” tab in your Wallpaper Engine window and find the wallpaper you would like to use.
From here, click on this wallpaper and select “Open in Explorer”. This will reveal all the files that make up the live wallpaper. Copy the location of these files by highlighting the file location in the bar near the top of the window.
Keep this window open, as we will need these files later.
Step
Upack scene file
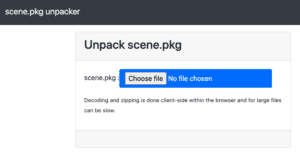
Now we will want to use the Unofficial Community Scene Unpacker. Open the URL: https://wetranslate.thiscould.work/scene.pkg/
Here, select “Choose file” and paste the file location into the top bar of the file explorer window, to open up the original wallpaper files. Press the scene file, indicated by the .pkg and select “Open”. Now click “Download scene zip” on the website. This will download the scene package to your computer.
Step
Create a new wallpaper
With Wallpaper Engine open, click on the two pencils icon in the top-right to create a new wallpaper. Next select “Use Template” and type in a project name for your new background and click “OK”.
From here, you will want to go to “Edit” in the top bar, then “Open in Explorer”. At this point, you will want to clear the current files in the folder. Next, copy and paste the original wallpaper files from Step 1 into this folder.
Step
Copy over the scene files
Up next, you will want to open the scene zip file from Step 2 and also copy these files into your new wallpaper folder. Once these have all uploaded you can go ahead and exit the folder.
Step
Add your audio file
Back in your Wallpaper Engine window, you should now see a duplicate of the community wallpaper. Let’s go ahead and add your audio file to it.
Click on this wallpaper and select “Open in Editor”. From here select “+ Add Asset”, “Sound” then “OK”. Find your audio file on your computer and select “Open”.
Once this is complete, simply click on “File” in the editor and select “Save”. And there you have it. To set your background to your new wallpaper, simply click on it in the Wallpaper Engine window and click “OK”.
Final Thoughts
So those were two ways to add music to your wallpapers on Wallpaper Engine. Remember if you want to add an audio file to a community wallpaper, make sure you have permission from the owner. Otherwise, crank your volume up and start playing those sweet tunes from your brand-new desktop wallpaper.
If you found this article useful, be sure to read our other How-To guides here.
About the Author