How to take a screenshot in Excel – 5 simple methods

Table of Contents
If you want to learn how to take a screenshot in Excel, we’ve got you covered.
Taking screenshots of your Excel worksheet is a great way to use your data, graphs, or analysis for presentations or making reports. Excel has some built-in features that can help you take screenshots of your data and visual representations.
We're here with five simple methods for quickly taking screenshots in Excel so you can make reports easily!
How to capture screenshots in Excel
Scenario on hand: We have an Excel worksheet that we want to screenshot.
What we want to accomplish: Explore how to take a screenshot in Excel using the following ways:
- Using the keyboard shortcut
- Using the copy as picture option
- Using the camera tool
- Using the snipping tool
- Using third-party screenshot apps
Using the keyboard shortcut
The first method of capturing a screenshot in Excel seems easy, but it is time-consuming compared to other options.
Here are step-by-step instructions to use this button to take a screenshot:
- Open the Excel file that you have to take a screenshot of.
- Locate the print screen button on your keyboard. Depending on your hardware, it might have an icon or a print screen short form written on it.
- Adjust the Excel workbook so you can take the screenshot.
- Press the Print Screen button on your keyboard.
- You can paste this screenshot into an editor like Paint on Windows or Preview on MacOS by right-clicking and selecting Paste or using the shortcut Ctrl+V. You can also paste it directly into the document or presentation where you want to add the screenshot and crop it to your desired dimensions using the cropping option.
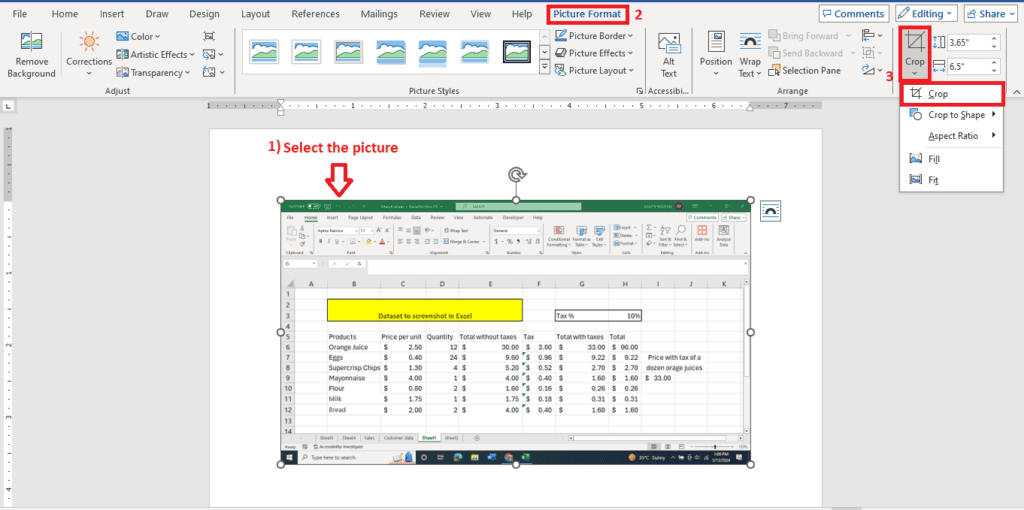
- You can also use Paint or any other software to edit the screenshot according to your needs and save it as a picture.
Using the copy as a picture option
The above option is lengthy as you cannot directly crop the part of your Excel file you want to take a screenshot of.
This second method of taking a screenshot uses the in-built screenshot option in Excel to take a screenshot of selected cells. Here's how it works:
- Select the cells that you want to take a screenshot of like this:
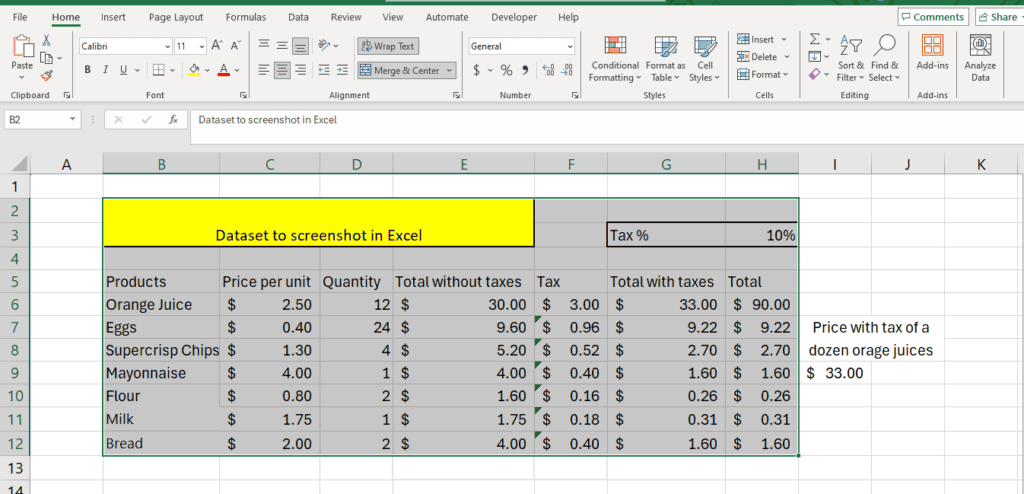
- Go to the clipboard options on the Home tab and select the Copy as Picture option by clicking the copy icon:

- Upon clicking this option, you will get a small window to select the type of copy you want to make:

- To take a screenshot of a picture, use As shown on screen and select the Picture format. You can choose the Bitmap format if you wish to paste the selected cells as a picture. The ‘Picture' format lets you copy cells with a transparent background.
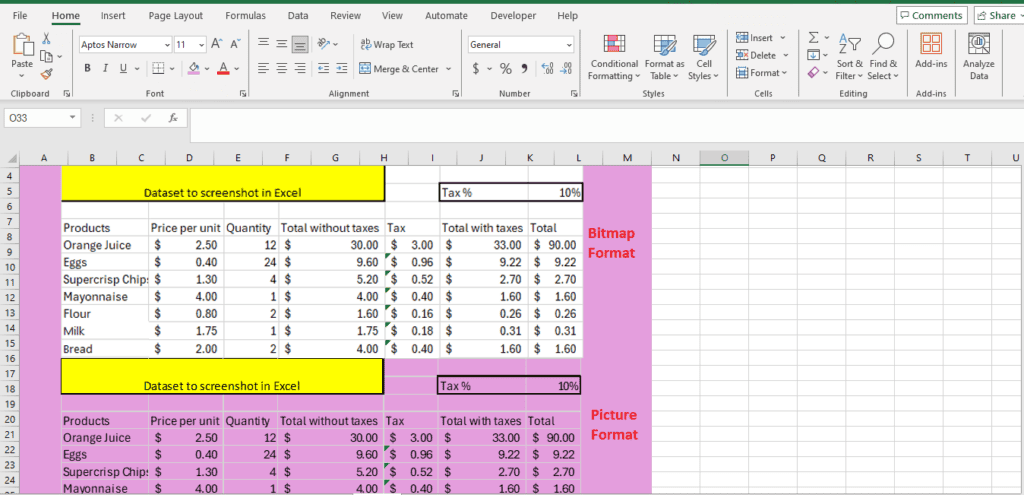
- You can choose the As shown when printed option to get the cells in a transparent background.
- Paste the captured screenshot on Paint or any other editor to save it as a picture, or directly use the picture in your document or presentation without the hassle of saving it separately.
Using the camera tool
Excel has an in-built camera tool that you can use to capture a selected area in your workbook. While the camera option isn't enabled by default, you can enable it from the options.
Here's how you can enable the camera tool in Excel:
- Go to the File tab > Options.

- Select Quick Access Toolbar from the options window and go to All Commands.
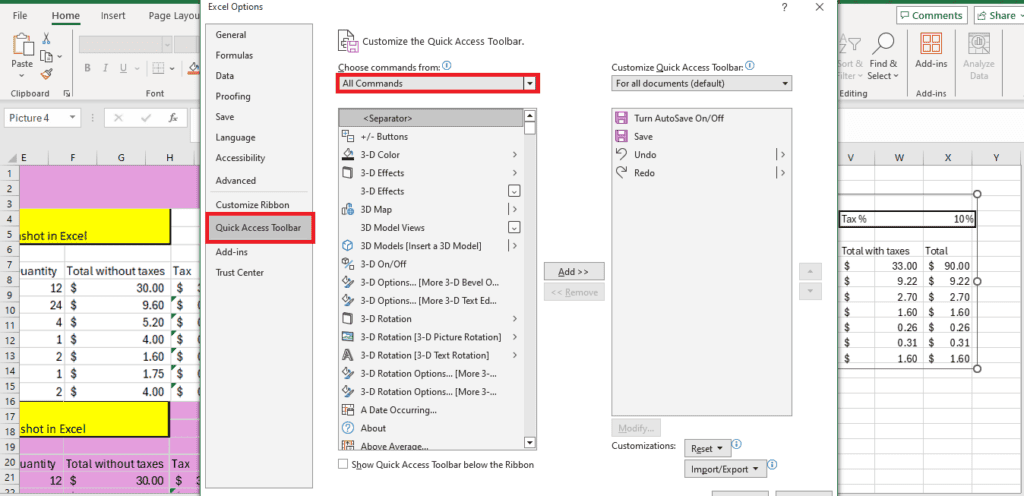
- Select Camera from the list, then click Add to add this option to your top ribbon.
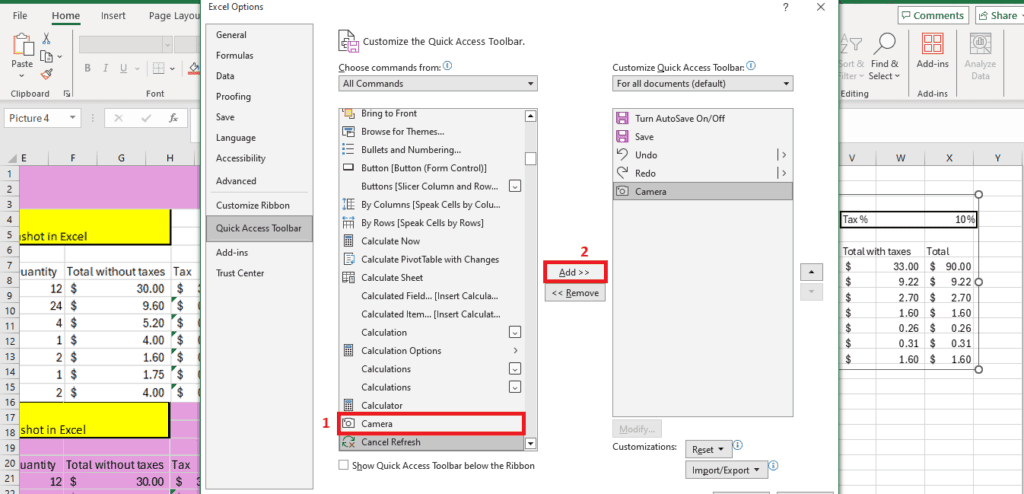
Now that you've added the Camera tool to your options, here's how to capture a screenshot with it:
- When you want to take a screenshot, click the camera icon at the top. This will give you a + shaped cursor to select the area you want to capture.

Using the snipping tool
The Snipping Tool in Windows or the Snip & Sketch Tool is also a great way to capture a part of your screen as a screenshot rather than the entire screen. Here's how you can use this option:
- Use your computer's search bar to search for the Snipping Tool. This tool is pre-installed on your computer with your Windows program.
- You might also have the Snip & Sketch Tool, which is an advanced version of the Snipping Tool. You can use either tool to take a screenshot of your Excel workbook.
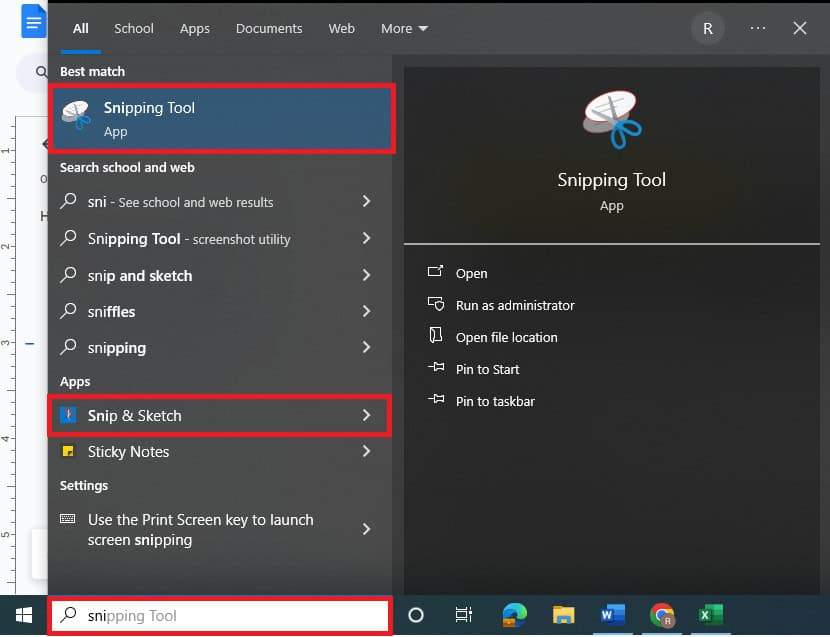
How to use the Snipping Tool
- To take the screenshot using the Snipping Tool, open the application.
- Select the mode of the screenshot.
- Once you have selected the snipping mode, click New and take the screenshot.
- If you choose to take a rectangular snip, you will get a + on your cursor to make the selection.
How to use Snip & Sketch
- You can search for Snip & Sketch using the Windows search bar or use the shortcut Windows logo key+Shift+S to snip without starting the application.
- Alternatively, you can start the application and choose a timer to take a screenshot or click New to get a + cursor.

- When you click New, you get four options for your selection:
- Rectangular snip
- Freeform snip
- Window snip
- Screens snip

Using third-party screenshot apps
While these pre-installed tools can help you capture and edit screenshots, you can also use advanced screenshotting and editing tools like Lightshot, Greenshot, and Snagit to make more advanced edits.
Here are step-by-step instructions on how to use Snagit for screenshots:
- Download Snagit from its official website.
- Download the Snagit.exe file based on your system (Windows or MAC)
- After downloading, open the exe. file and follow the on-screen instructions to install the app on your system.
- Create a TechSmith account to sign in to the installed app.
- You can purchase a Snagit plan or start a 15-day trial to check out the app's features.
- Here's the app's interface.

How do I take a screenshot in Excel without lines?
Go to the copy option on the Clipboard options on the Home tab from the top left and click Copy as picture. Select As shown when printed to take an Excel screenshot without lines.
How do I take a screenshot of Excel with a keyboard?
The print screen button on your keyboard allows you to take an Excel screenshot. You can also use the Windows logo key+Shift+S shortcut to take a screenshot using the pre-installed Snip & Sketch app.
Wrapping up
Now that you know how to take a screenshot in Excel, you can finally build reports or make presentations easily. In this guide, we’ve explained five different methods for the task. The best part is that all of five of them are beginner friendly, so you won’t have any issue even if you’re new to Excel.
If you want to continue learning about Excel, give these guides a read:
