How to install Windows 11 on an unsupported CPU

Reviewed By: Kevin Pocock
Table of Contents
This article will show you how to install Windows 11 on an unsupported CPU. If you have an older PC, it might not meet the Windows 11 hardware requirements. Most of the incompatibility may come from the requirement to have a TPM 2.0 module on your motherboard as well to get it going, but you don’t have to try and spring for one if you don’t want to.
Luckily, there is a way to install Windows 11 on unsupported CPUs, so here’s a step-by-step guide on how to do it. The first option gives you the ability to install it fresh onto any PC, and the other as an upgrade to a Windows PC already.
Install Windows 11 on an unsupported CPU with Rufus
Step
Download Rufus
Head to the Rufus website and scroll down to the download section. There, pick the option that best suits your needs, with either a portable option or an installer for different Windows versions.

The program requires a USB stick with at least 8GB of space, and it will be wiped. So be sure to have it cleared of any files you need.
Step
Prep the Windows ISO
Once you have downloaded Rufus, launch it and prep the USB stick with the Windows version you want.
Here, you can select the disk you want to install it on, and then you can pick the boot option. There is the choice to download Windows through Rufus or select an ISO you already have downloaded.

Step
Modify and install the ISO
Once you have your ISO, select it in the boot selection menu.
Then, you won’t need to change anything else in that window, as Rufus will set everything correctly for you. You can hit start to get the following menu to modify the installer.
Since it’s Windows 11, Rufus allows you to adjust the user experience to customize the installation and your OS.
To install Windows 11 on an unsupported CPU, you want to tick the first option and remove the requirement for secure boot and TPM 2.0. This will allow you to install it on any PC, no matter if it meets the requirements.
Then hit ok and wait for the installer to finish. It might take some time to make the drive show up and disappear, along with Windows making disconnect and connect noises, so just be patient.

In customizing your user experience, you can also turn off having to make an online Microsoft account and disable data collection. So, if you want to make an offline account without having to click through all those annoying setup questions, you can select these tick boxes as well.
Step
Install Windows 11
After your USB is ready, you will want to now install Windows 11 as you would on a fresh build.
To do so keep the USB plugged in and access your BIOS (hold/mash DEL on rebooting/starting your PC) to adjust the boot priorities and set the USB to be on top. Or access your boot menu on startup and select the USB.
This will take you to the standard Windows installation process. So select the drive and partition you want to have Windows on to boot from.
After going through all that you should have the modified fresh install of the OS.
If you’re installing it on the same PC as you created the USB, be aware it will wipe the partition where you installed it. So, if you have files and folders that need backing up, do so before reinstalling your OS.
Windows 11 on unsupported CPU registry edit
Step
Download the Windows ISO
Download the Windows 11 ISO from the Microsoft website.
To do this, open your browser and go to the Microsoft website. Scroll down to the “Download Windows 11 disk image (ISO)” section and select the “Windows 11 multi-edition ISO” from the drop-down menu.
Click on the blue “Download” button, then select your preferred language and click the “Confirm” button. Finally, click on the blue “64-bit download” button and choose a location to save the file on your desktop.

Step
Bypass the CPU check
You'll need to edit the Windows registry. To do this, press the Windows button and type “Registry editor” into the search bar.
Select “Registry Editor” from the search results.

Navigate to the following location: HKEY_LOCAL_MACHINE\SYSTEM\Setup\MoSetup.
Right-click on an empty space on the right side of the window, hover over “New,” and select “DWORD (32-bit) Value.”

Rename this value “AllowUpgradesWithUnsupportedTPMOrCPU” Double-click on the key and change the “Value data” to “1.” Save the changes and restart your PC.

Step
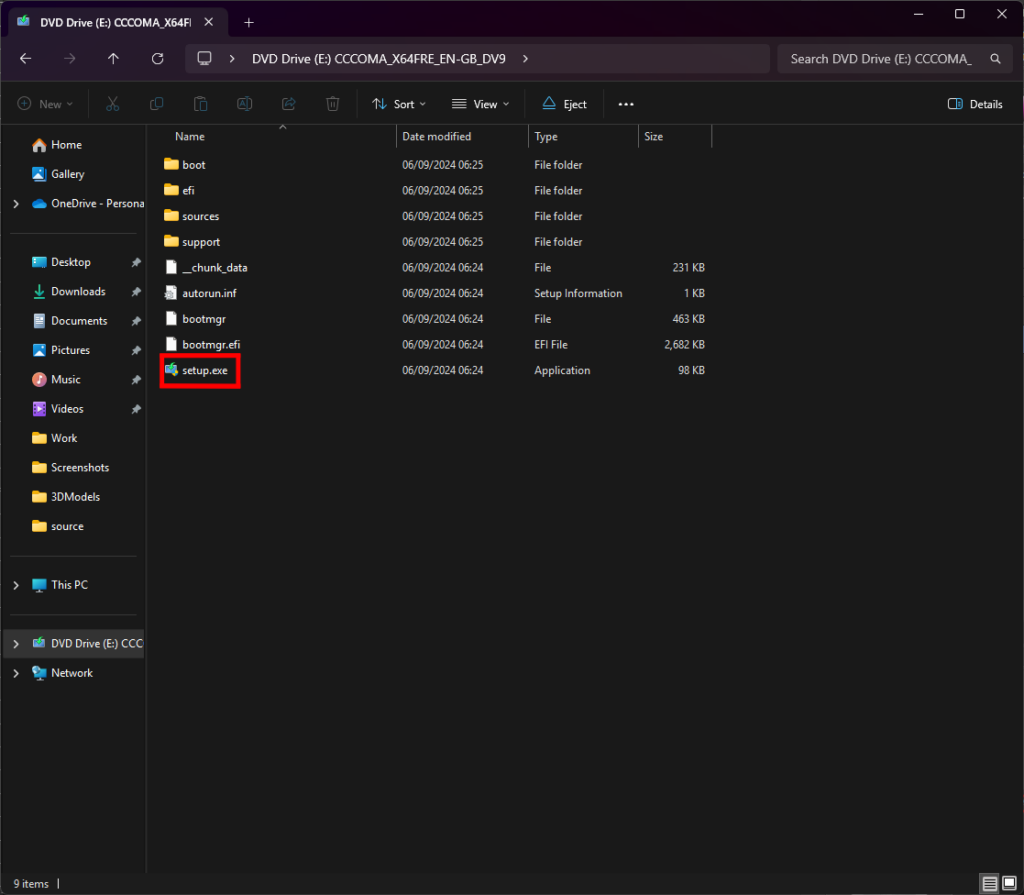
Open the ISO
Now, open the ISO file in Windows explorer and launch the setup.
To do this, right-click on the ISO file and select “Mount.” A new virtual drive will appear on your PC. Double-click on the “setup.exe” file to start the installation process.

Keep in mind that Microsoft has stated that following this workaround may result in not receiving future security updates, so it is important to carefully consider whether this is the right decision for your specific situation. Also, be very careful when renaming the folder; copy-paste the name exactly as found here.
Final thoughts
Installing Windows 11 on an unsupported CPU isn’t particularly hard, but if you’re not confident or comfortable changing your registry, there are other options. These may include a new build and a new CPU for Windows 11 use.
Or, if you want to keep it a bit simpler and less precarious and don’t want to mess around with the registry, Rufus is an equal method. This way, you can treat it like a normal Windows USB installer. Either method should let you enjoy the latest Microsoft operating system.
About the Author