How to print address labels from Excel: our step-by-step guide

Reviewed By: Kevin Pocock

Table of Contents
Mail merge in Excel is a fantastic feature that can help send emails in bulk, but you can also use it to print address labels. The entire process revolves around preparing the label data and then using the mail merge feature to print them. However, for those who are new to Excel, the process can be challenging.
This is where we come in. In this guide, we will walk you through how to print address labels from Excel. So, without any further ado, let's get started!
How to print mailing labels from Excel
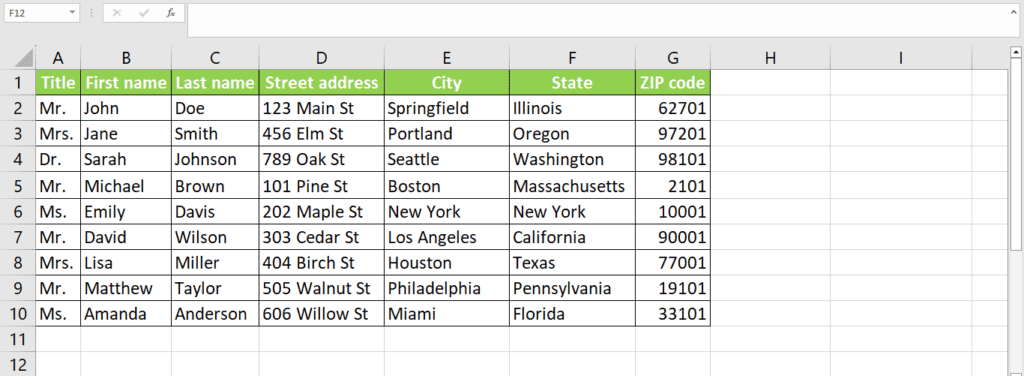
Below is a fictional dataset of customers with their titles, first names, last names, street addresses, city, state, and ZIP codes. With those, we will find out how to create address labels using Excel and Word by following a step-by-step guide:
Step
Create an Excel worksheet
The first step is to accumulate your dataset in one Excel sheet and clean the data, with each entry in the correct column.
If you start with the label-making process before gathering and cleaning your data, you will end up with a disuniform format or missed packages because of wrong address labels.
When you're creating columns for address labels, here are some columns to add to your data:
- Title (Mr, Ms, Mrs, etc.)
- First name
- Last name
- Street address
- City
- State
- Zip code
For our demonstration, we have created a dataset of 9 addresses. Note that the columns are on the first row of the worksheet.
Step
Using Word to create labels
With your Worksheet saved, it's time to open Microsoft Word, where you'll select the types and sizes of your labels.
First, open a new Word document. At the top of the screen, select the “Mailings” option. From the options that appear below, select the “Start mail merge” box. From the drop-down that opens, select “Labels…”

This will open up a “Label Options” window. From here, you can pick a brand by clicking the “Label vendors” drop-down and the “Product number” below (which you can get from the label package). When you are finished, hit “OK”.
For this demonstration, we selected “Avery US Letter” as the Label vendor and “5160 Address Labels” under the product number.
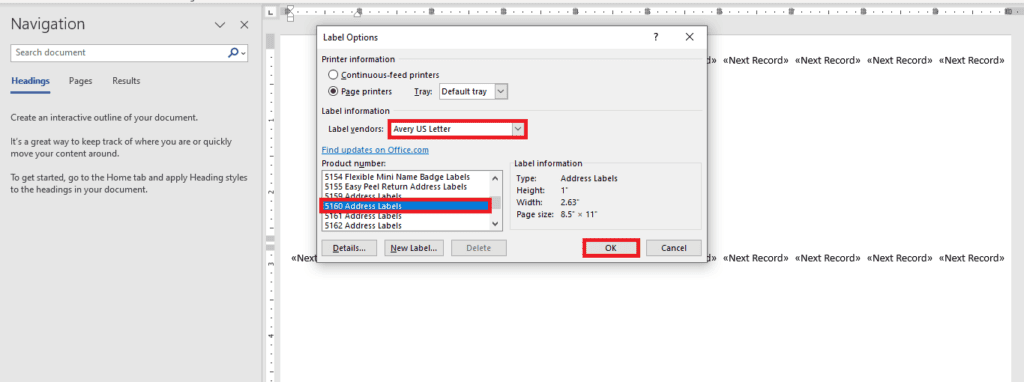
Alternatively, you can click the “New Label” button at the bottom and create your own label with customized dimensions.
Step
Ensure file format coversion is on
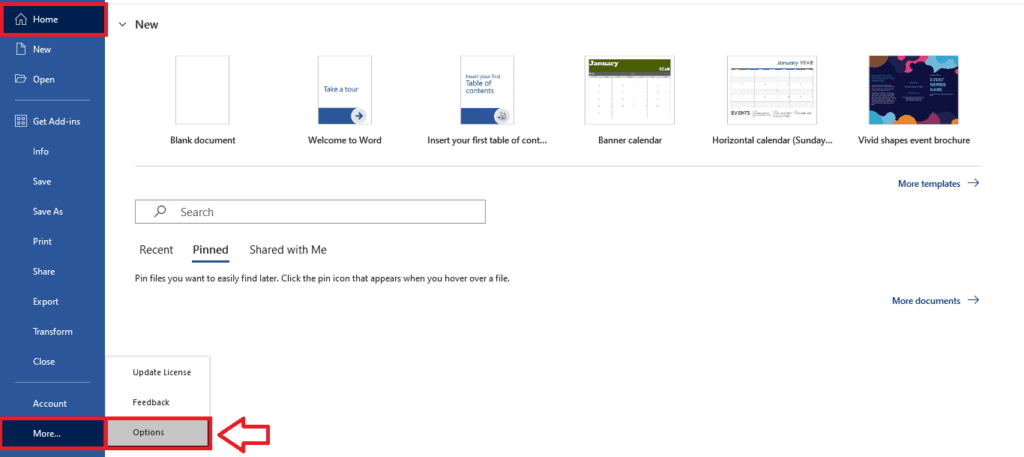
First, open Word and select “File” at the top right. From the side panel that opens, select “Options.”
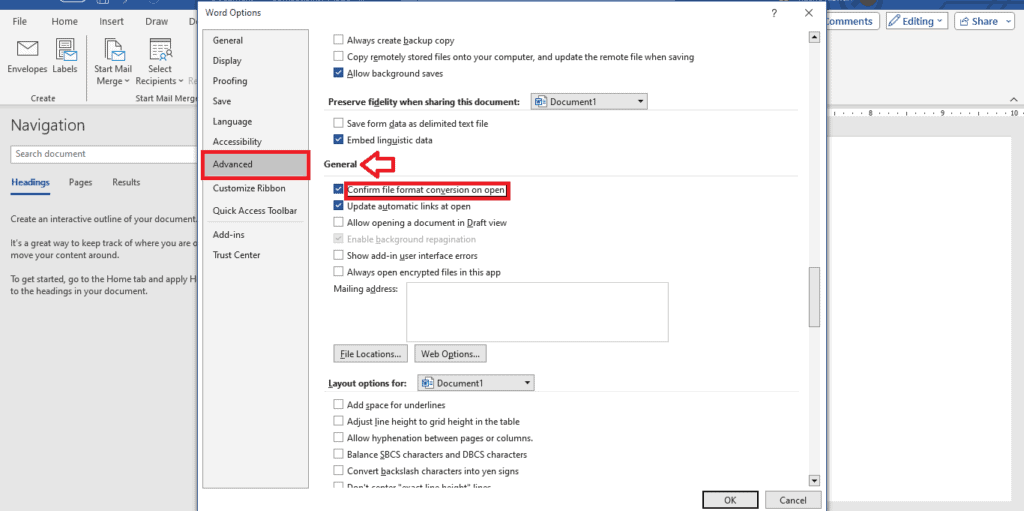
This will open up a new window. Select “Advanced,” then scroll to the “General” subheading on the right. Ensure the “Confirm file format conversion on open” box is ticked. Hit “OK”.
Step
Connect your worksheet to your labels
Now that the label type and size are set up, you need to connect the Word document with the data on the Excel worksheet.
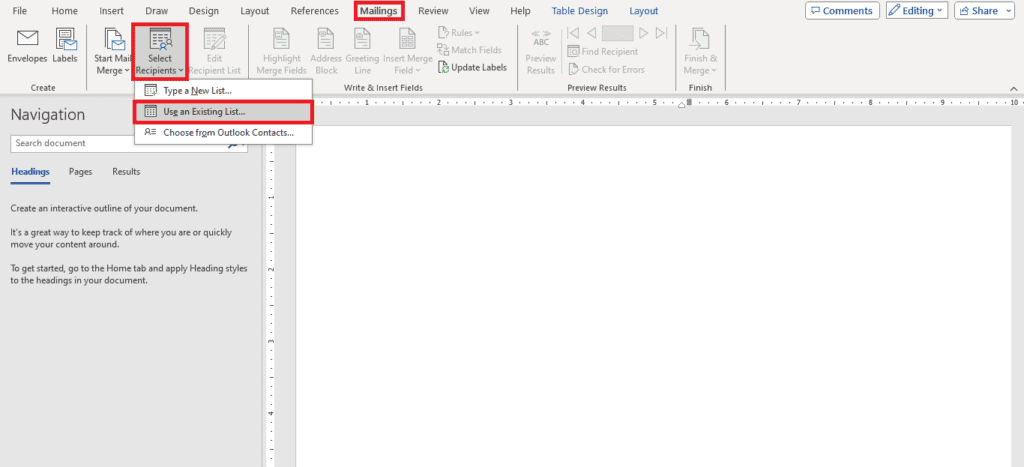
Click “Mailings” at the top, then “Select Recipients”. From the drop-down, select “Use an Existing List…”
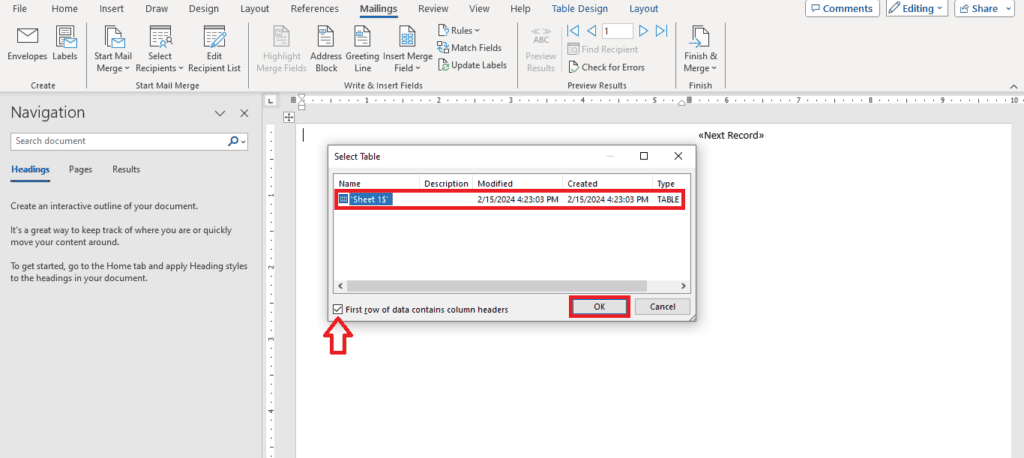
From the options, select the Excel Worksheet. Click “OK,” then pick the table with your list in. Ensure that your first row is column headers, then hit “OK” again.
Step
Mail merge
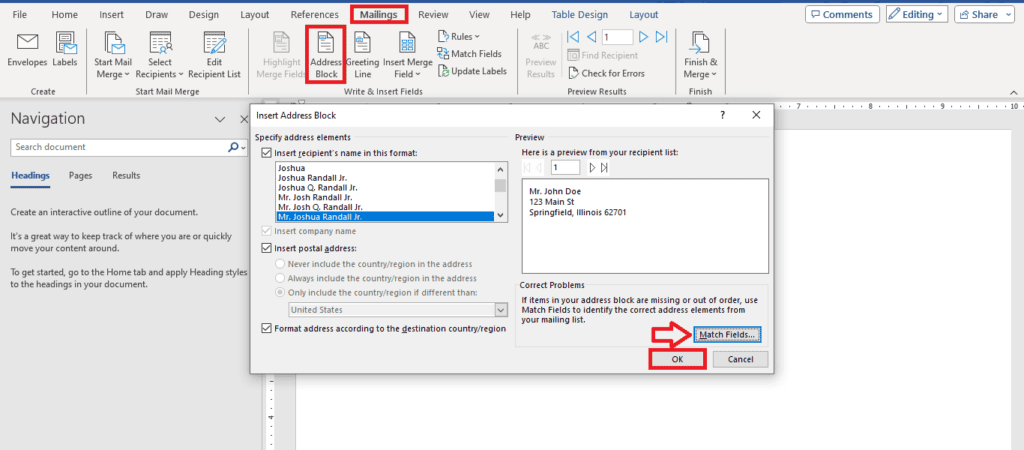
Finally, go to “Mailings”. There, select “Address Block.” Find the button that says “Match Fields…” on the bottom right, ensure your headings are in the correct places, and hit “OK.”
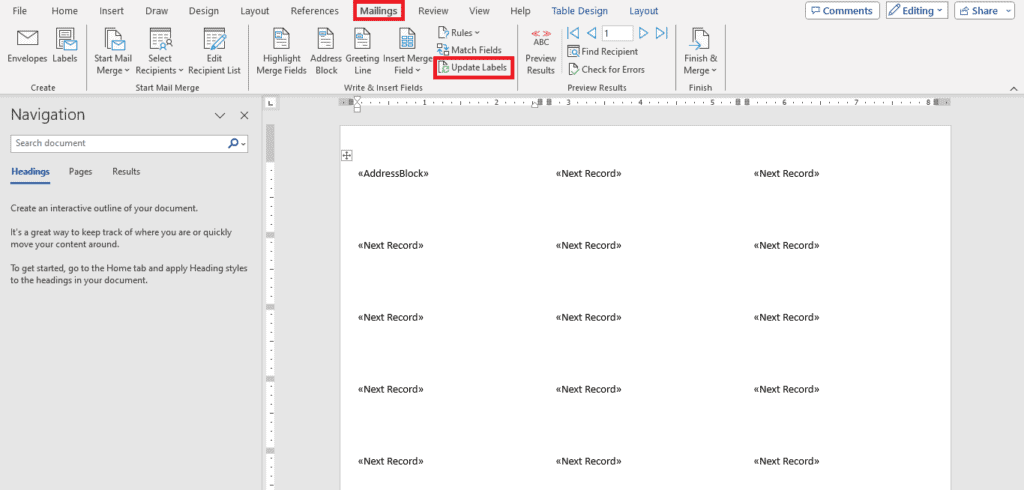
This will create a page with placeholders for the “Next Record.” To add all address labels on one page, go to “Mailings” and find “Update Labels.”
Step
Previewing labels
Click “Preview Results” to adjust the spacing and ensure everything is okay.

Step
Finalize labels
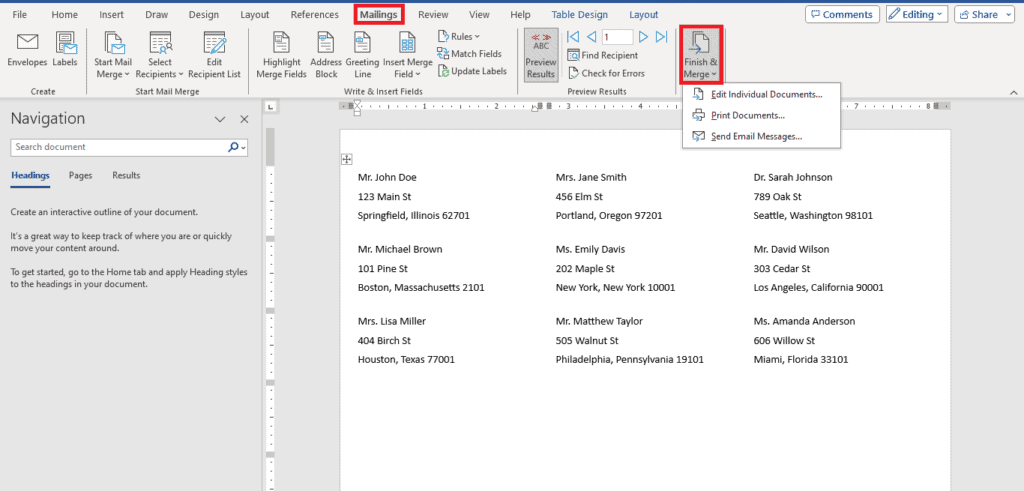
Lastly, click “Finish & Merge” on the right of the “Mailings” options. Select “Edit Individual Documents” and select “All” to get a Word file of your labels.
Step
Adding borders to your labels
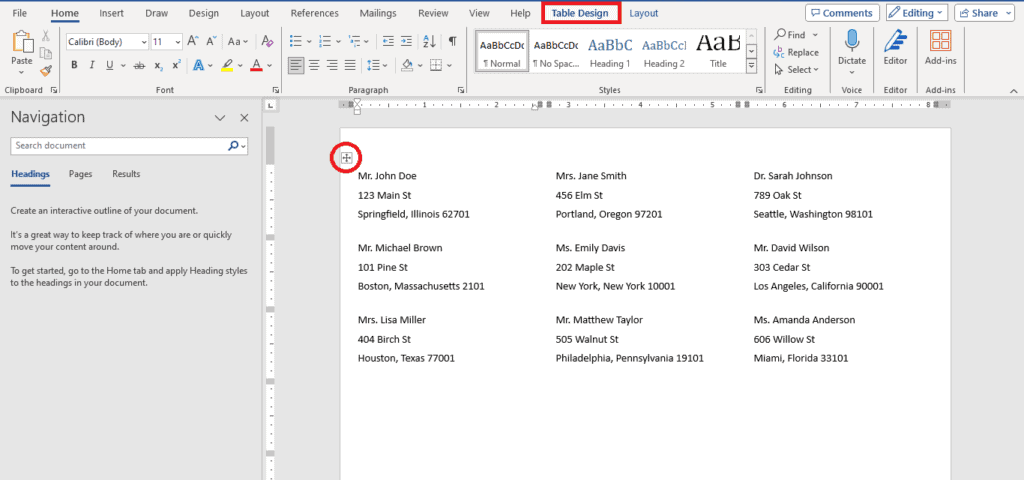
Once you've finalized your labels, adding borders to them is a great way to make them look uniform. The Word mail merge labels feature adds all the information from your Excel workbook in the form of a table.
So, to add borders, go to the top right corner of your sheet to locate an icon that lets you select the table. This will add two more items to the menu on the top: “Table Design” and “Layout.”
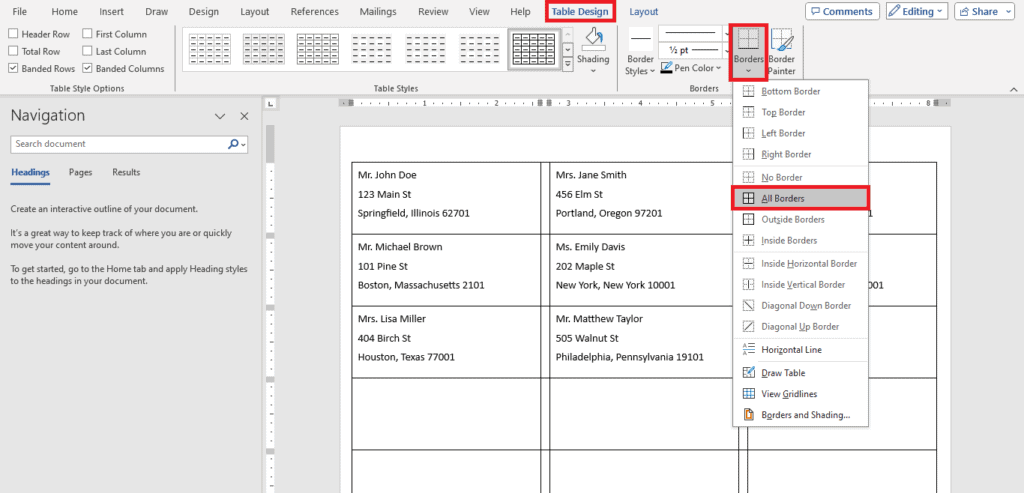
Head to “Table Design” to add borders to this table.
On the left, locate the borders options and enable “All Borders.” This will create borders for all your labels.
If you wish to change the look of the borders, use the options on the left. This will allow you to change the border color, border style, and thickness. Here's the final look of our labels with a thickened border: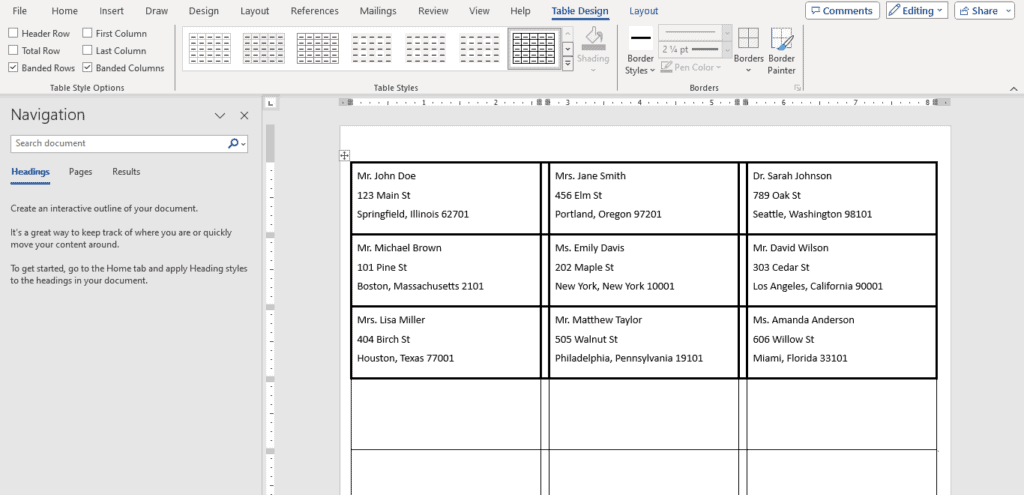
Final word
This was everything you needed to know about printing address labels from Excel. This guide is perfect for businesses that have to ship out packages. Mainly because organizing and cleaning the data in Excel and then using Word's mail merge feature assures that there is not even a slight chance of error. You can even use this trick to send your Christmas cards or wedding invitations.
If you’re looking for some more Excel guides to read, we have plenty more to choose from. These include how to do a mail merge from Excel to Word, how to autofill in Excel, and how to lock a column in Excel. These should make you a pro in the software in no time, making it all the quicker to get the job done.
About the Author